
How To Use A Calligraphy Pen [Step-By-Step Tutorial]
Calligraphy is beautiful, elegant and sophisticated, which is exactly what attracted most calligraphers to this hobby to begin with! But picking up a calligraphy pen for the first time can feel like the exact opposite of this.
While it may be clumsy and foreign at first, with a few basics down, you'll be able to start practicing calligraphy today with the tips and steps in this tutorial.
We're going to cover all of the fundamentals:
How to put together and use a calligraphy pen
Calligraphy pointed pens compared to other pen types, like brush markers and fountain pens
Practice tips
Becoming acquainted with the tools is the biggest beginner obstacle in learning calligraphy, so let's dive in so you can take your first steps toward writing those beautiful lines, curves and flourishes for yourself!
Pause now to pin ↓
Table of Contents
Introduction To Different Calligraphy Pens
Calligraphy, or the art of beautiful writing, is as old as writing itself and has been practiced all over the world.
Over the millennia, calligraphers have used a huge variety of pens and brushes in their pursuit of perfect penmanship. At another point in time, a calligrapher may have picked up a bamboo brush or a reed stylus to create their work.
Nowadays, a calligrapher may pick up any of these common writing utensils:
Dip pen
Fountain pen
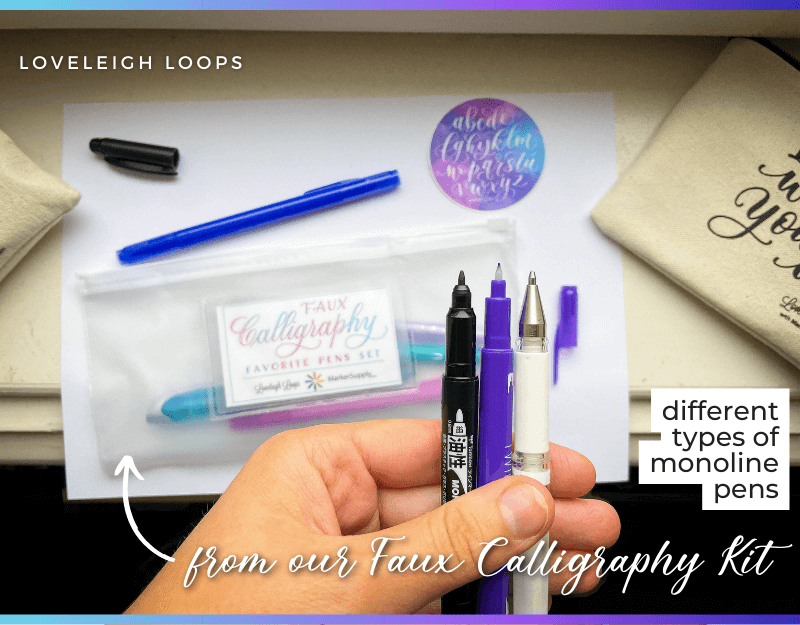
Monoline pen
Brush pen
Let’s look at these 4 types of pens, what style of calligraphy they can create and how to use them.
Prefer to watch? Here’s our video tutorial ↓
Dip Pen
The dip pen is a calligraphy pen that is used in traditional scripts such as Copperplate and Spencerian.
This writing utensil can be referred to as a:
Calligraphy pen
Dip pen
Pointed pen
As the name suggests, before you can use a dip pen, it needs to be dipped in ink such as Sumi Ink or India Ink.
Most calligraphers who write traditional western calligraphy (calligraphy written with the Latin Alphabet, like this!) use a version of the dip pen.
This is an example of Copperplate calligraphy
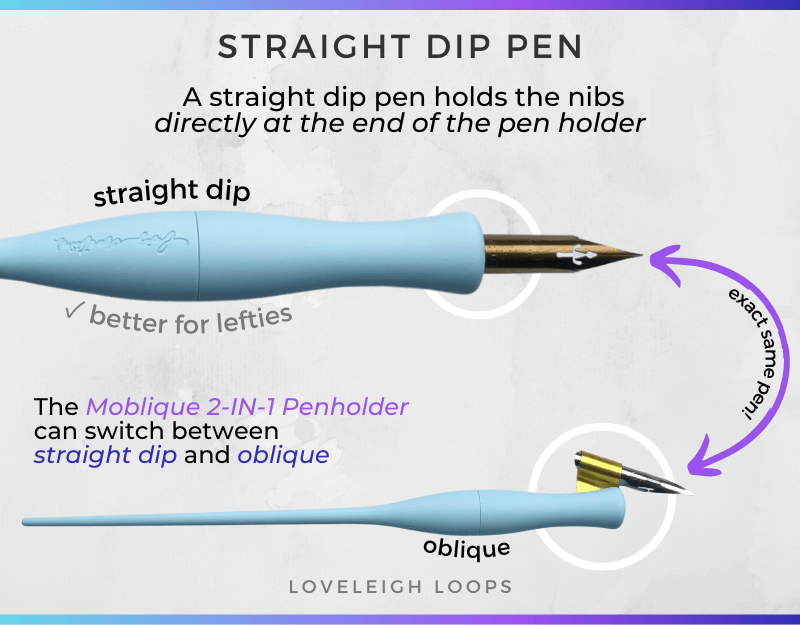
Dip pens come in two types - oblique dip pens and straight dip pens. The pen holder remains the same, but the pen's nib angle changes significantly (see the image below):
The straight pen holder looks very much like a fountain pen. It consists of a nib and a pen holder. The nib comes straight out of the pen holder and runs parallel to it. This is recommended for left-handers.
For oblique holders, pen nibs are at an angle to the holder. Oblique calligraphy pens make it easier to write at an angle so that your letters look more slanted.
We recommend the Moblique 2-in-1 Penholder because it can switch between a straight dip pen and an oblique dip pen and you can try it out both ways:
We'll show you more about how to put together your dip pen in a minute!
You may also like: Intro To Pointed Pen
No matter which way you use your pointed pen, it's pressure sensitive, which is its most important characteristic. That. means you can get thick strokes when you press down. This is a quality that the next pen type on our list does not share…
Fountain Pen
To this day, the classic fountain pen remains a popular choice amongst handwriting aficionados all over the world. With some people spending a small fortune on a custom-made one, fountain pens are considered to have a certain timelessness and sophistication to them.
At first sight, a fountain pen looks very similar to a pointed pen as both pens have pointy, metal pen nibs at the end:
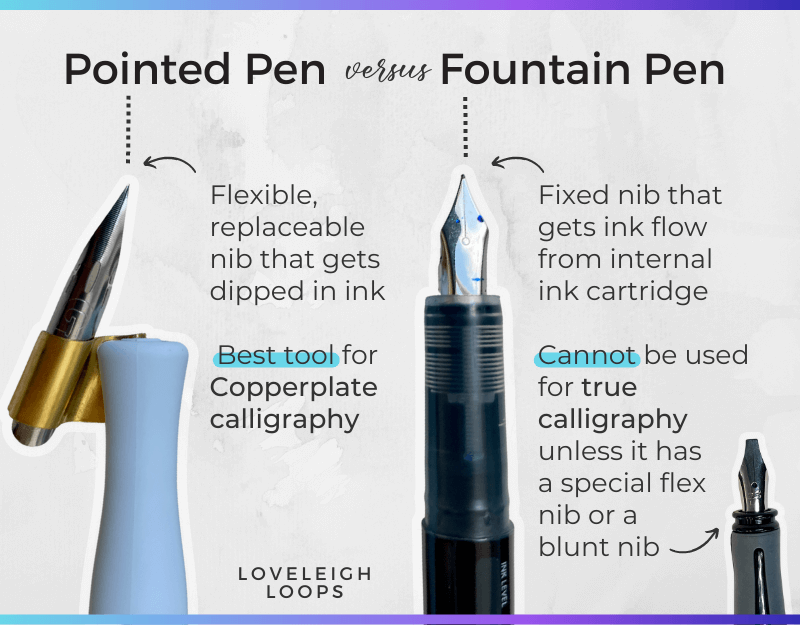
Pointed pen versus a fountain pen
But a closer examination shows that fountain pens have 2 features that set them apart from traditional pointed dip pens:
Fountain pen ink comes in an ink cartridge. Like the ink in household ballpoint pens, fountain pen ink is stored in an ink reservoir inside the pen itself. That means the pen doesn’t need to be dipped in ink to write.
A fountain pen generally has a fixed nib that dispenses the ink.
Because of the non-flexible nib, fountain pens don't need added pressure to write. No matter which direction you're going or how much pressure you apply, the fixed pen nib always glides smoothly over the writing surface and the line is always equally thick and smooth (unless you’re using a specialty flexible fountain pen nib).
For this reason, a fountain pen fits into the monoline pen family.
Fountain pen ink is super smooth to write with because it’s water based and just flows onto the page, unlike the oil-baed ink of a ballpoint pen.

Fountain pen ink versus dip pen ink
However, this smooth and consistent line also means that fountain pens are of limited use when it comes to writing calligraphy.
Fountain pens can only technically be used for writing calligraphy if you're writing faux calligraphy. As a result, fountain pens are not considered true calligraphy pens.
If you want to use a fountain pen for calligraphy, you first have to outline the letters and then add shade (width) to the downstrokes:
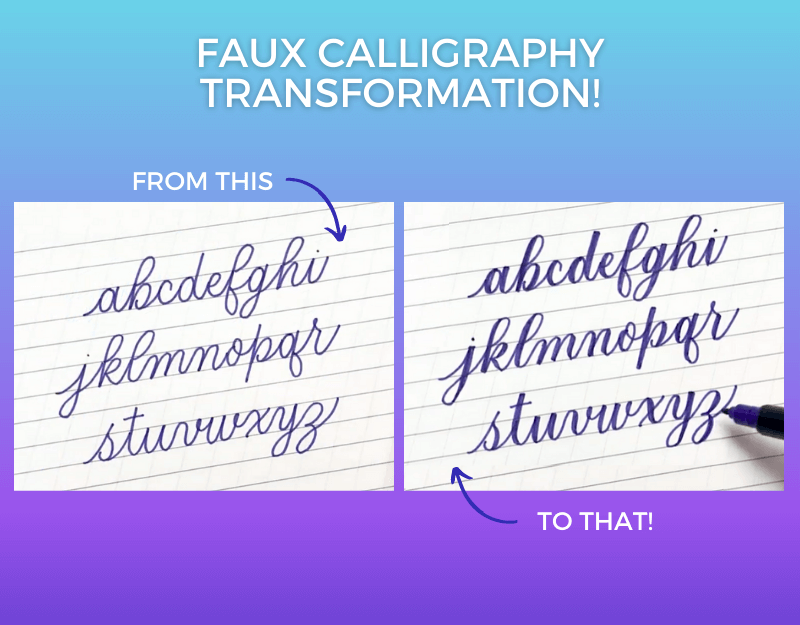
Learn more in our faux lettering guide.
If you're looking to try one, you can buy one alone or get a Zebra fountain pen in our faux calligraphy kit.
It's also possible to achieve thick and thin strokes using a wider nib size, as in a broad-edge nib:
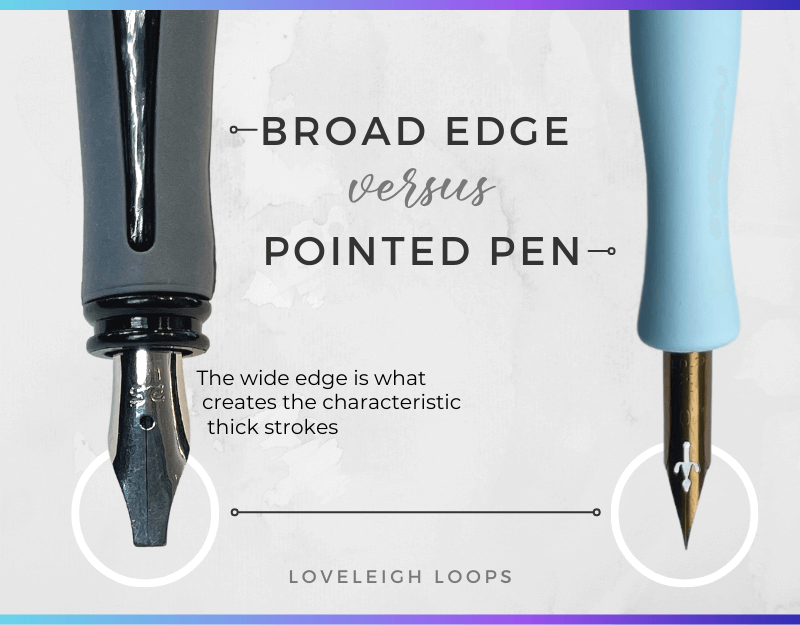
On the left, see this example of a broad-edge fountain pen. This is generally referred to as just a “broad edge pen”
The broad edge pen is most commonly seen in the Gothic or Blackletter style of calligraphy using italic nibs.
Italic nibs have a blunt edge that creates variations in line thickness and the different strokes are achieved by changing the direction of the nib moving across the paper, rather than the pressure.

However, fountain pens just don't come with the same variety of nib sizes and nib flexibility as the pointed pen (which is the best tool for writing the traditional calligraphy style).
Fountain pens are also limited in their variety of ink.
You may also like: How To Do Easy (FAUX) Calligraphy
Brush Pen
Brush pens come in a wide variety of colors and sizes and are a popular choice in modern lettering. Here at Loveleigh Loops, we especially love all the fun and creative effects you can achieve using brush pens, such as blending, shadows and ribbon lettering.
As the name suggests, a brush pen combines the flexible tip of a brush with the ease of use of an ordinary pen. They’re the youngest pen of these 4 popular pen types, and became available for purchase during the 1960s.
Just like the fountain pen and our household ballpoint pens, the ink cartridge comes loaded inside of the pen body and therefore doesn't require an external ink source to dip in.
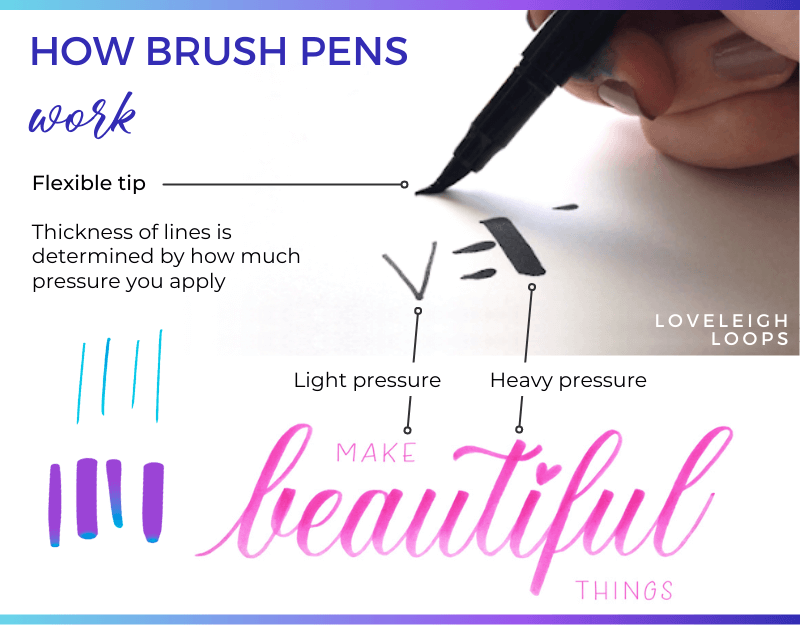
Unlike the metal nibs of the other pen types, brush pens are often felt-tip pens (but can also come with bristle tips).
The flexible tip found in brush tip pens is very responsive to pressure which makes it a great calligraphy pen!
Simply use a light touch to create thin lines and apply more pressure to draw the thick shades.
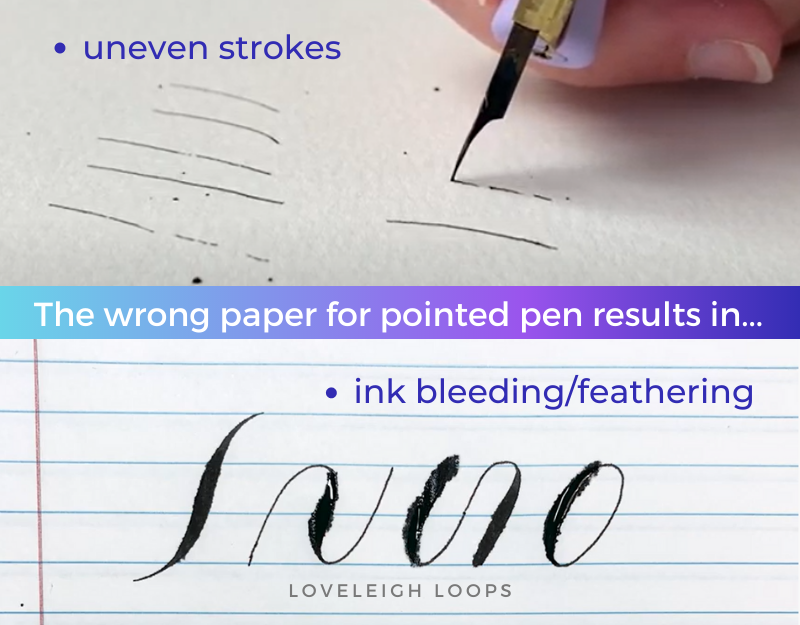
Keep in mind that brush pens don't work well on every writing surface. Before you pull out scrap paper to try brush lettering, first check that your paper is labeled "smooth" or you'll damage the felt tip of the pen.
It's okay to use scrap low-quality paper with SOME types of calligraphy pens - our calligraphy paper guide is a great cheat sheet to find the right paper for your specific writing utensil.
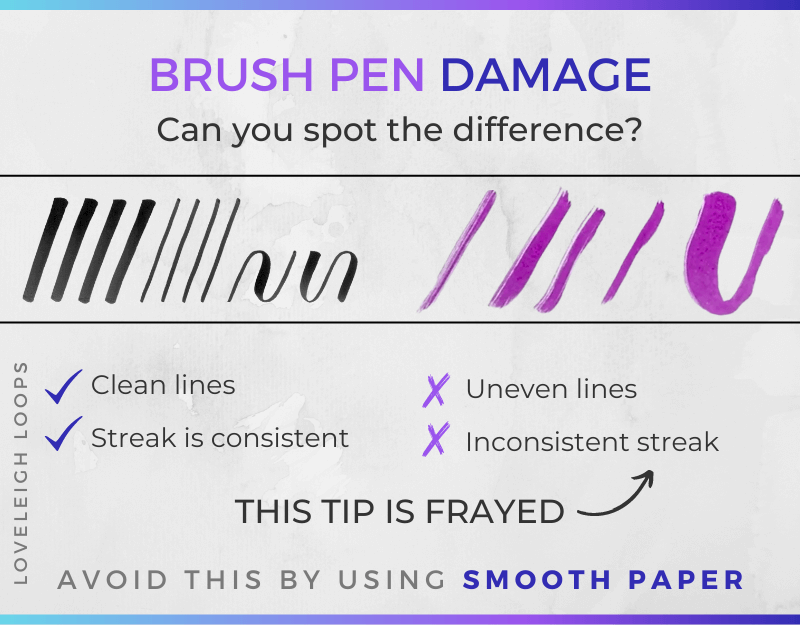
The wrong paper choice can destroy your tools
Brush pens are a great option for any beginner that's looking for calligraphy pens that are both flexible and budget-friendly, just like our next pen option.
You may also like: How To Use A Brush Pen
Ballpoint Pen
Named after the metal ball that dispenses the oiled-based ink across your paper, the iconic ballpoint pen is a staple in schools, offices and can even be found on the calligrapher's desk.
Its convenience is likely what cemented the ballpoint pen’s use in our daily lives: the ink flow is reliable, they work on almost any writing surface and the ink cartridges rarely leak.
While a ballpoint pen is perfect for everyday writing, it's incapable of creating the contrast in line width that's at the heart of both modern and traditional calligraphy.
Just like the fountain pen, it fits into the monoline category, and is therefore only used for faux calligraphy.
Even though you CAN do a form of calligraphy with it, a ballpoint pen shouldn't be considered a calligraphy pen.
After comparing the 4 most common pen types, it's time to zoom in on the best calligraphy pen: the dip pen!
You may also like: The 5 Types Of Calligraphy Pens
How To Put Together A Dip Pen
The pointed pen comes with multiple parts and is the only calligraphy pen that needs to be assembled to use.
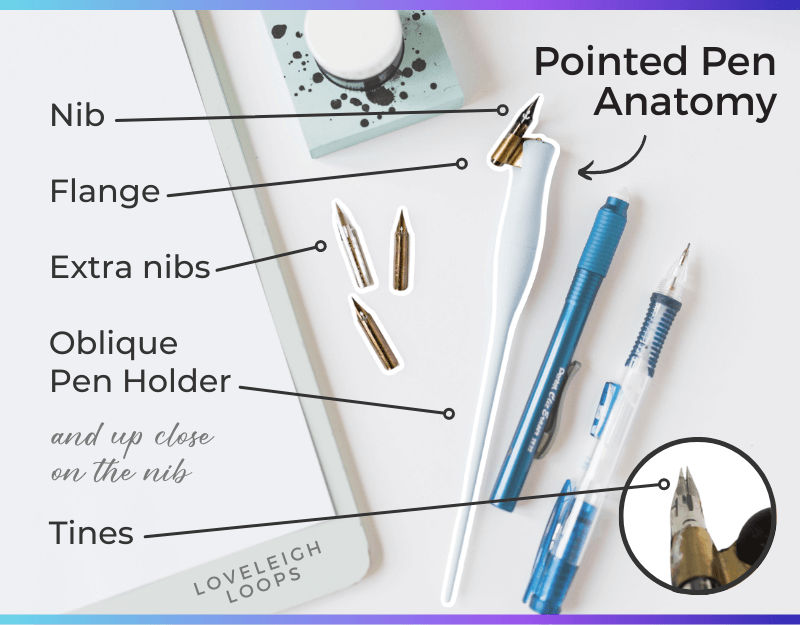
A pointed pen consists of 3 main components:
Pen holder: the part you hold in your hand
Flange: only found in an oblique pen, this is the copper piece that holds the nib at an angle
Pen nib: the metal nib that controls the ink flow
For beginners, we recommend the Moblique 2-in-1 Penholder and the Nikko G Nib (though we explore different nib widths, flexibility and more in our calligraphy nibs guide).
Before you can put together a pointed pen, you have to first decide if you’re going to use it straight or at an angle. Straight is better for lefties, and angled is often preferred by righties, but you can try it either way.
To put together a straight pen:
Simply push the rounded end of the nib into the slot at the wide end of the pen holder
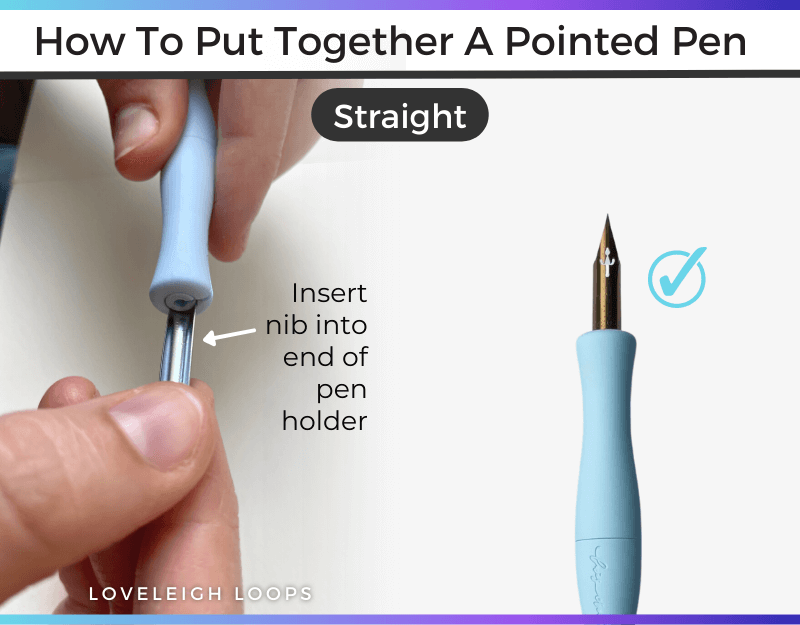
This angle is best for left-handed calligraphers
To put together an oblique pointed pen:
Pick up the flange by the curved part. Squeeze it and push it as far as it goes into the wide end of the pen holder
Insert the curved end of the nib into the flange. Push it in far enough so that the tip of the pen nib is aligned with the center of the pen holder
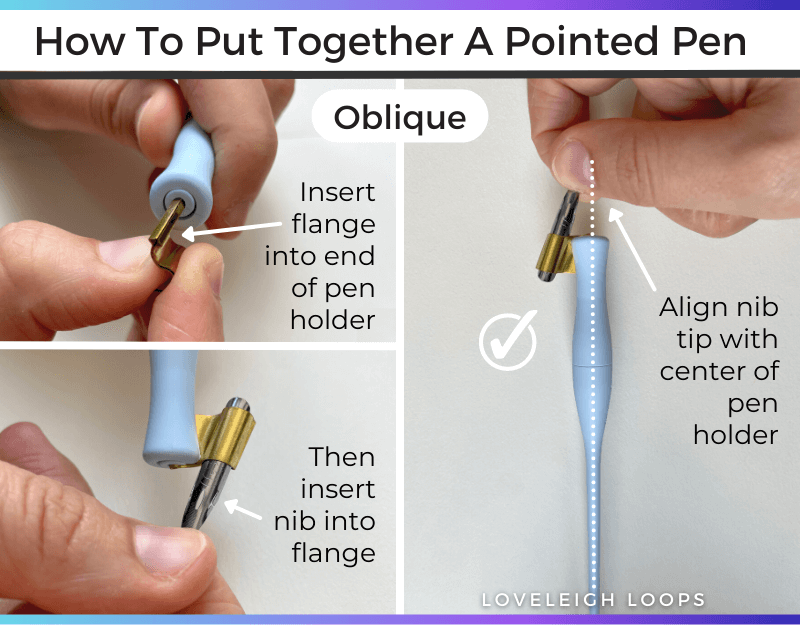
This is typically the perferred way to use a pointed pen for most calligrapher writing in a traditional style
Once your pen has been assembled correctly, you're ready to write! But understanding how the pressure sensitivity of a pointed pen works will help you learn more quickly.
This brings us to the nibs.
You may also like: Best Traditional Calligraphy Supplies
How Pointed Pen Nibs Work
While it may look like every calligraphy nib is the same, there are actually hundreds of different nibs on the market.
They all share this important characteristic: in pointed pen calligraphy, a calligraphy pen has a flexible nib.

The flexibility is what allows for more or less ink to flow onto the paper
This means that thicker lines are achieved by applying more pressure, which separates the tines (the nib tip) and allows more ink to flow onto the paper.
You may also like: Best Calligraphy Nibs For Beginners
Want to learn even more about nibs? We have an entire beginner nib tutorial where we answer FAQs, demo popular nibs and share recommendations:
How To Use A Pointed Pen
Learning how to write calligraphy using a pointed pen is a fun process! It does present a learning curve, but with time and practice, you'll quickly start to see your skills improve and your calligraphy get better and better.
For first-time users of dip pens, it's important to prep the nib so the ink flows properly when you use it.
Why? Brand new nibs have a coating on them from the manufacturer which needs to be taken off. Wipe the nib off with some dish soap or even Windex to remove this coating.

These are our favorite nibs, which come in our custom calligraphy kit
Not sure if your nib has the coating still or not? See if the ink is pooling on the nib, and this is an indication that it needs to be prepped.
You may also like: How To Do Pencil Calligraphy
How To Dip A Pointed Pen
Let's take a moment to talk about how to use ink in calligraphy.
Believe us when we say that learning how to dip a pen correctly saves you a lot of headaches!
Unlike a cartridge-filled pen such as a fountain pen, a dip pen has to be dipped in ink before you can write with it.
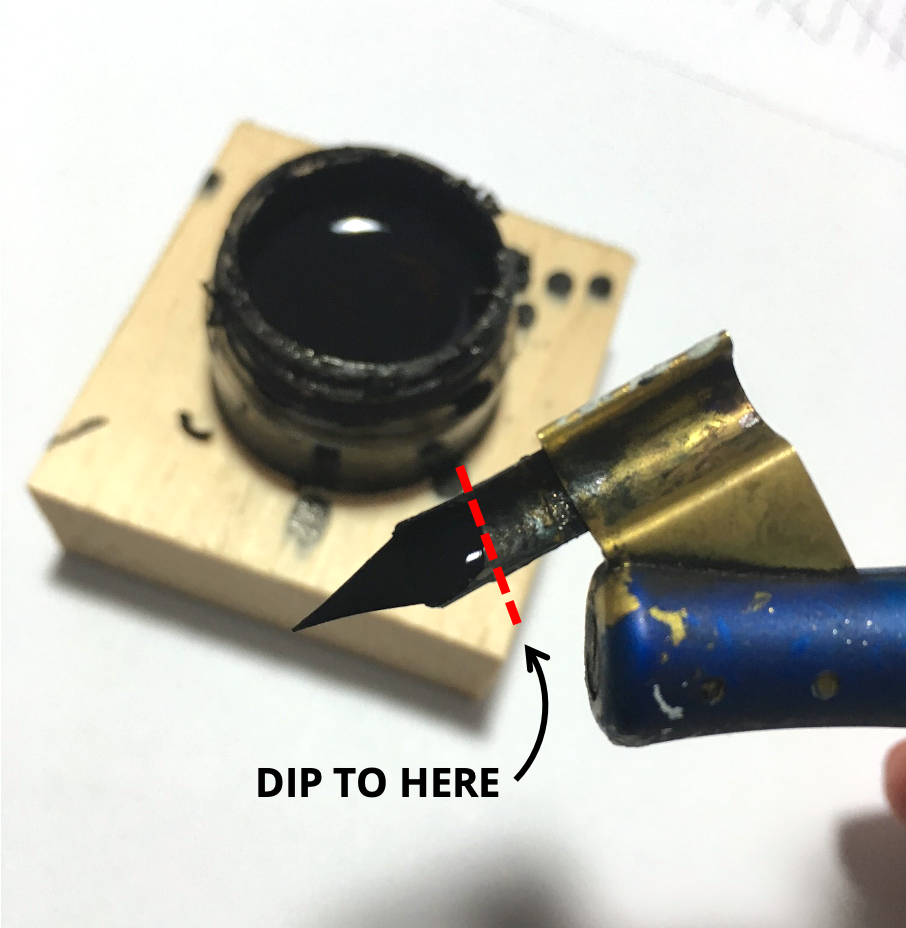
How far to dip your pointed pen
In every nib, there's a small hole that needs to be covered in ink. Dip your pen into the ink bottle and stop once the ink reaches the hole.
Shake off excess ink and so that the ink doesn't blob on your paper.
You may also like: 20+ Free Calligraphy Printables
Calligraphy Ink
There are many different calligraphy inks on the market, and we recommend Sumi Ink for beginners.
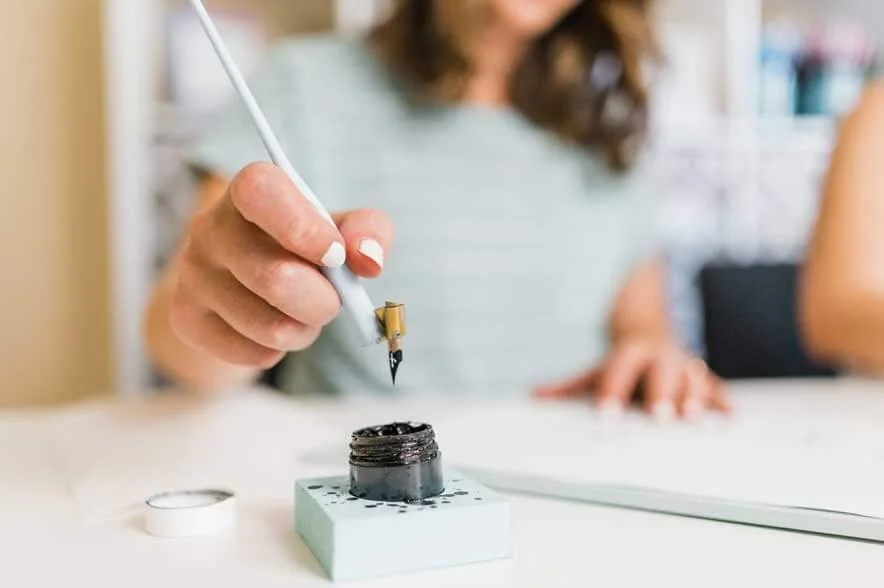
Jordan dipping her pointed pen in ink
You may to adjust your ink to get the right ink flow. For example, if you find yourself with ink blobs on the page, it can either be a matter of ink flowing badly.
Some calligraphy inks need to be diluted before use and you can often improve ink flow by simply adding a little water!
Should you find yourself with too much ink on the nib, simply use a paper towel or a piece of scrap paper to get rid of any excess ink.
You may also like: Common Ink Problems Solved
Using A Calligraphy Pen For Practice
Calligraphy pens aren't as easy to use as regular pens, but with some practice and muscle memory, you'll learn how to control your pen. Let's start with how to hold a calligraphy pen.
How To Hold A Calligraphy Pen Correctly
You hold the calligraphy pen the same way you hold a fountain pen, pencil or any normal writing utensil. Simply hold the pen between your thumb and your index finger, but be aware of the angle.
If you want to learn calligraphy in a classic style such as Copperplate, you need to learn to write at a 55-degree angle. This is simple with our guide sheet - we've drawn the 55-degree angle on for you! Just align your nib with the guides.
Angle is important because you won't be able to create thick downstrokes unless the angle of the nib is parallel to the movement of the pen.
This is why we prefer an oblique pen - the nib is already held at an angle, making writing slanted letters a lot more natural.
Just like brush pens, pointed pen nibs will work best on the correct writing surface. We recommend HP Premium 32lb Paper. This will prevent your ink from bleeding through or across the paper.
Low-quality paper creates big headaches for calligraphers
How To Clean A Pointed Pen
In order to protect your pens, we recommend cleaning the nib every time you take a break or stop practicing.
We use an ordinary paper towel to wipe off the ink. You can also use a spray bottle to slightly dampen the towel and the ink will come right off.
You may also like: How To Practice Copperplate
How And What To Practice
Practice sheet, ink and nibs are at the ready?! You only need ONE more sheet of paper and then it's time to start practicing!
This last sheet of paper is a guard sheet between your palm and the HP Premium 32lb Paper that you're writing on.
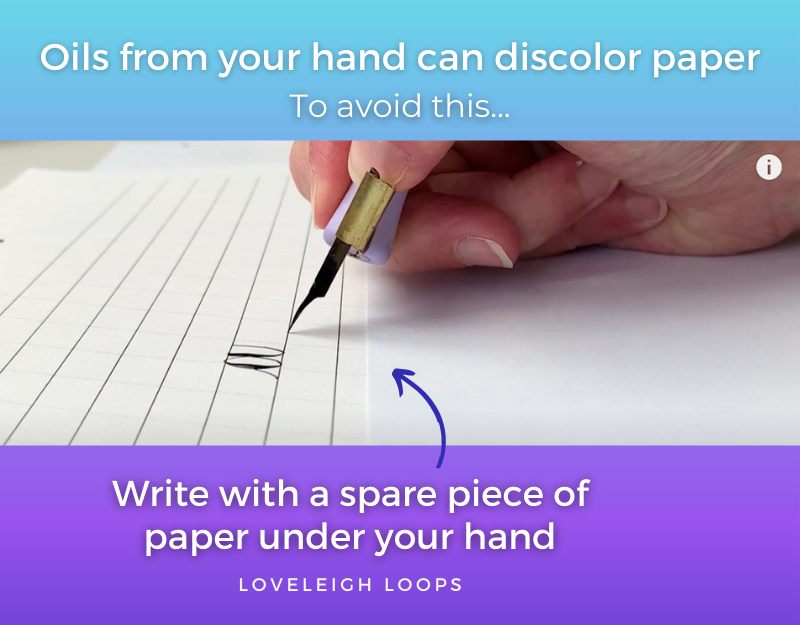
This is a best practice for all of your lettering practice!
A guard sheet protects your writing surface from the oils on your skin, which can lead to paper discoloration over time.
This may seem like a small detail, but a part of learning the building blocks of calligraphy is proper technique, and it's important to practice the right way.
And speaking of building blocks, it's time to practice your strokes!
You may also like: The Basic Calligraphy Strokes
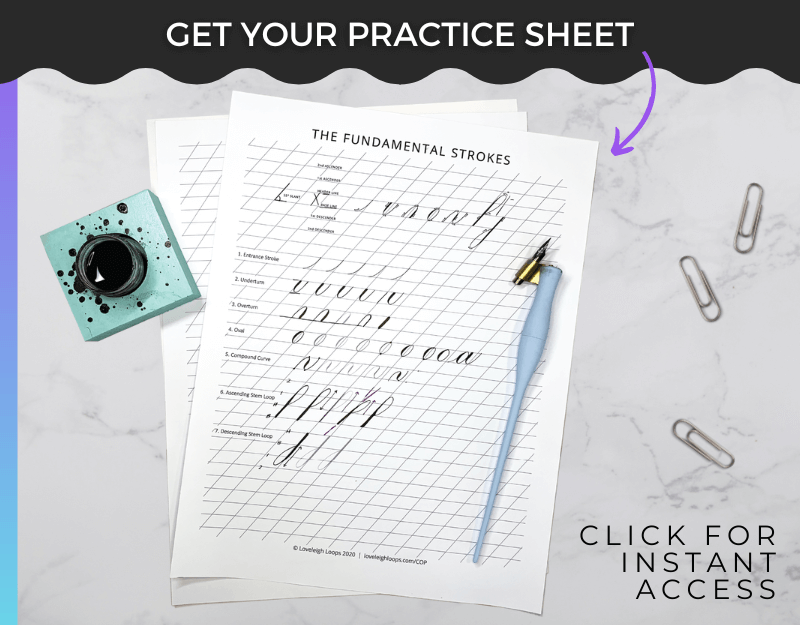
The Guide Sheet
Those thick and thin strokes that we’ve been talking about have easy names:
Thick strokes = downstrokes
Thin strokes = upstrokes
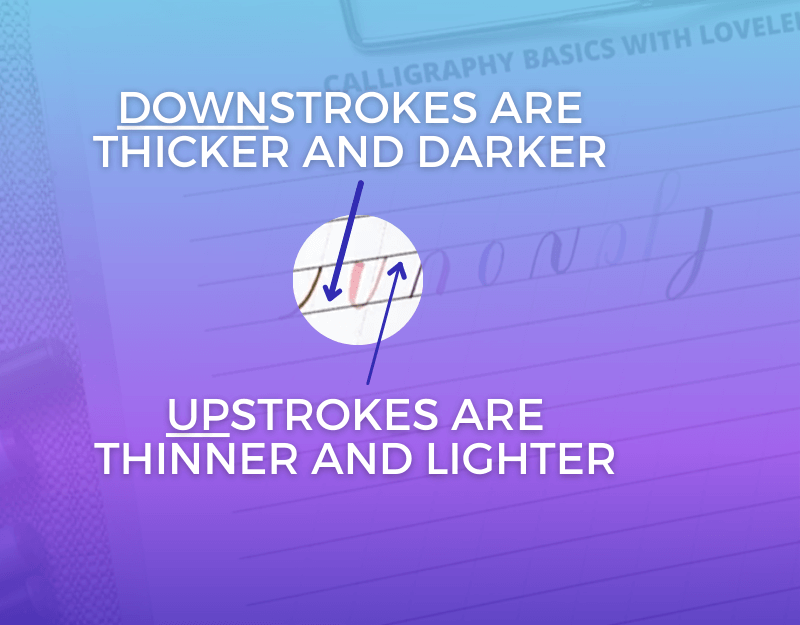
Upstrokes versus downstrokes
To achieve these different strokes, use a light touch when practicing your upstrokes and apply gentle pressure to create thicker downstrokes.
This is your first practice step: practice achieving thin upward strokes and thick downward strokes. Take some time to get a feel for the pen, how it moves across the paper and become more comfortable using it.
The most important skill to work on is consistency. This means that every stroke is ideally:
Equally slanted
Of equal length and
Identical width
Keep in mind that uniformity matters more than speed in calligraphy.
We highly recommend using our guide sheet every time you practice so that achieving the correct angle isn't a guessing game. This will do wonders for building up muscle memory!
Learn even more about the best practice technique in our video tutorial:
You may also like: The Different Types Of Calligraphy
The basic strokes
The next step in practicing calligraphy is breaking down each letter into individual, basic strokes.
You don’t write entire words or even letters at once. Instead, one stroke at a time, you perfect all the elements that go into writing each individual letter.
Most styles of western calligraphy use these same basic strokes as building blocks for their alphabets:

The Copperplate basic calligraphy strokes
Here’s an example. The lowercase letter a in traditional calligraphy is built from:
An entrance stroke
Oval
Underturn
See how the strokes build out entire letters:
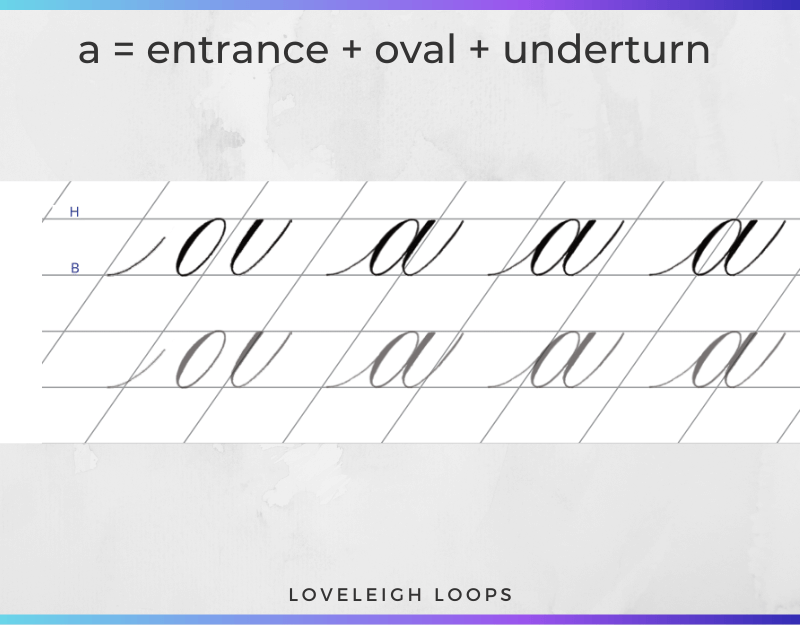
How the lowercase letter a is written in Copperplate
The Lowercase Alphabet
Once you're comfortable with the basic strokes, start combining them to form entire letters and words.
Practice along with our blog post on the lowercase calligraphy alphabet, where we break down every single letter stroke by stroke and show you how to create them yourself.
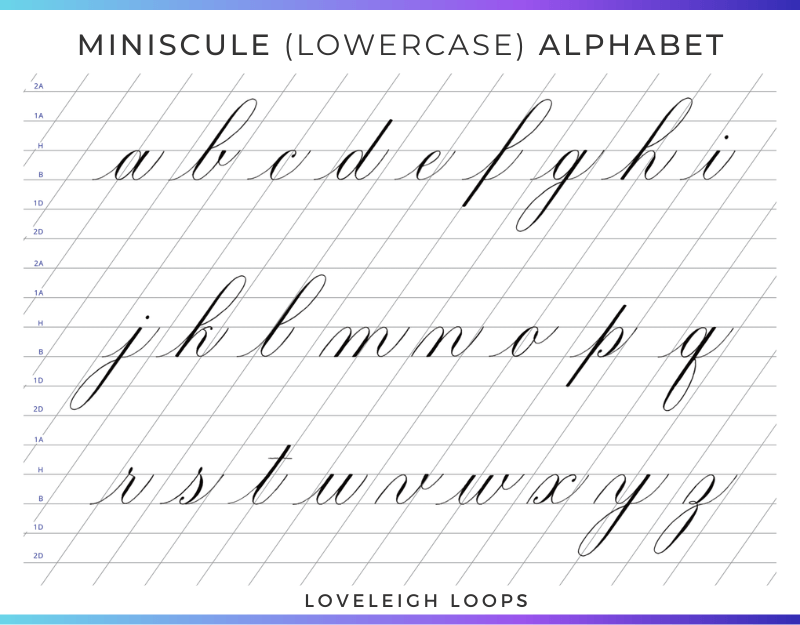
The lowercase Copperplate alphabet a to z
Learn Pointed Pen Calligraphy
We can help you improve your calligraphy, whether you're an absolute beginner or someone who has some experience and is just looking for a roadmap to better calligraphy compositions and technique!
From video tutorials on our YouTube channel to free practice sheets, we have tons of resources to help you get learn calligraphy and lettering!
Online Calligraphy Course
From choosing your tools to writing the alphabet and making compositions, our popular course Calligraphy on Point covers every single aspect of learning Copperplate.
Here's what past students have thought:
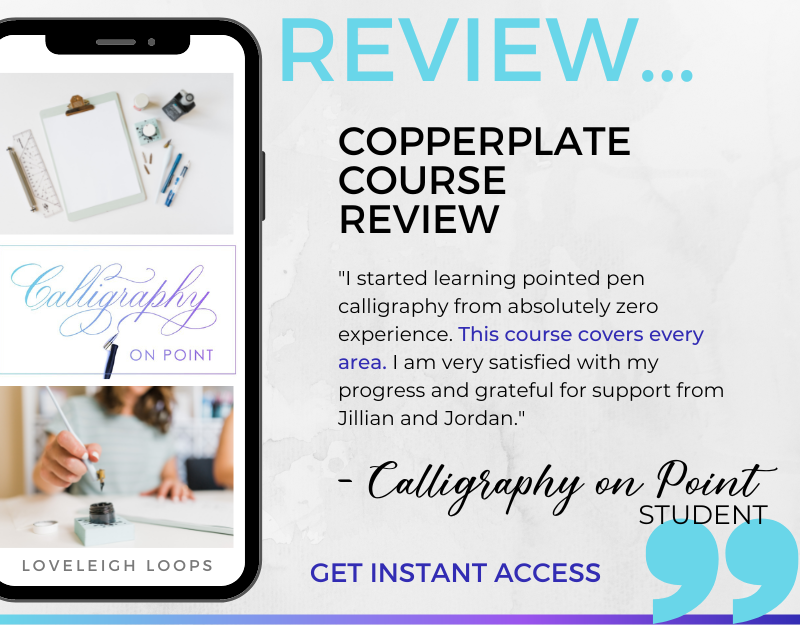
Student reviews from our Copperplate course
Get instant access to Calligraphy on Point now.
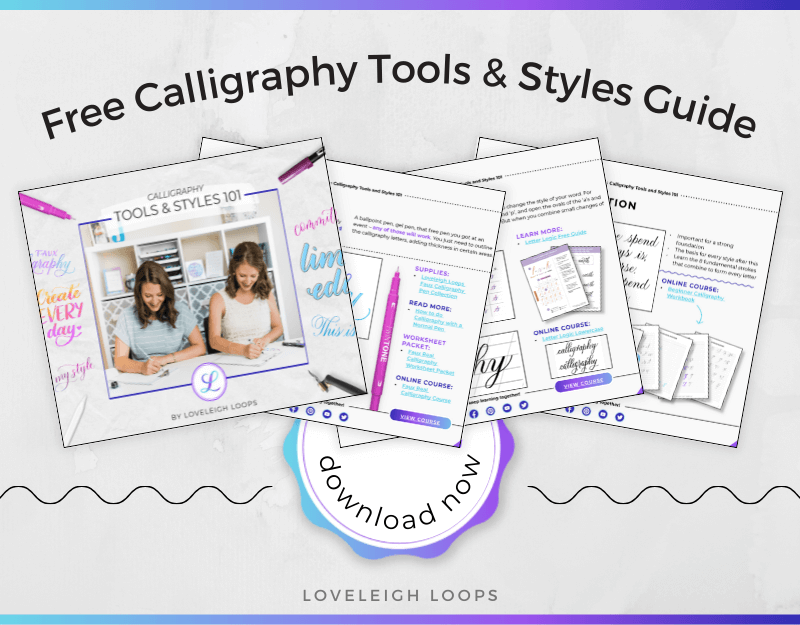
Tools And Styles Guide [FREE]
Get all of your questions about different lettering tools answered in our popular guide!
Final Thoughts
It can be intimidating learning how to use a calligraphy pen, but we hope that after this tutorial, the terminology and process are demystified!
We're here to support you on your calligraphy journey. We hope you'll join us in our Facebook group so that we can support your progress and answer your questions!
More beginner tutorials:
How to write mom, grandma, dad and grandpa in calligraphy: TUTORIAL
