Procreate Calligraphy Ultimate Beginner Guide
Procreate calligraphy has all the razzle-dazzle of an advanced art form, but it’s surprisingly easy to learn, even as a beginner.
Once you overcome the learning curve of a few basic Procreate settings and adjust to the different types of brushes, you’re going to be OBSESSED with your progress and the beautiful works you’re able to produce using just your iPad.
Pause now to pin for later! ↓
…with the right teachers and resources, that is.
We’re Jillian and Jordan, the calligraphy enthusiasts behind Loveleigh Loops. We picked up Procreate for the first time in 2017, and we remember being newbies vividly.
We know that too many people quit before ever really trying their hand at Procreate calligraphy, when they just needed some better instructions.
So shush that voice in the back of your head that whispers “can I even learn?!” because the lack of confidence is the ONLY thing in your way.
And congratulations are in order, because you’ve taken your first step to learning Procreate calligraphy and lettering (being here!). You’re 2 seconds away from step #2, which is getting acquainted with the software.
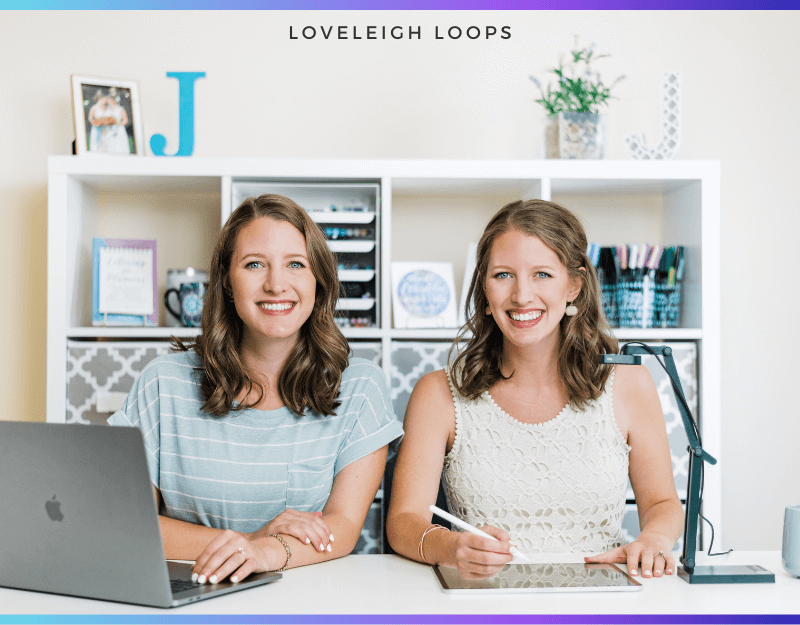
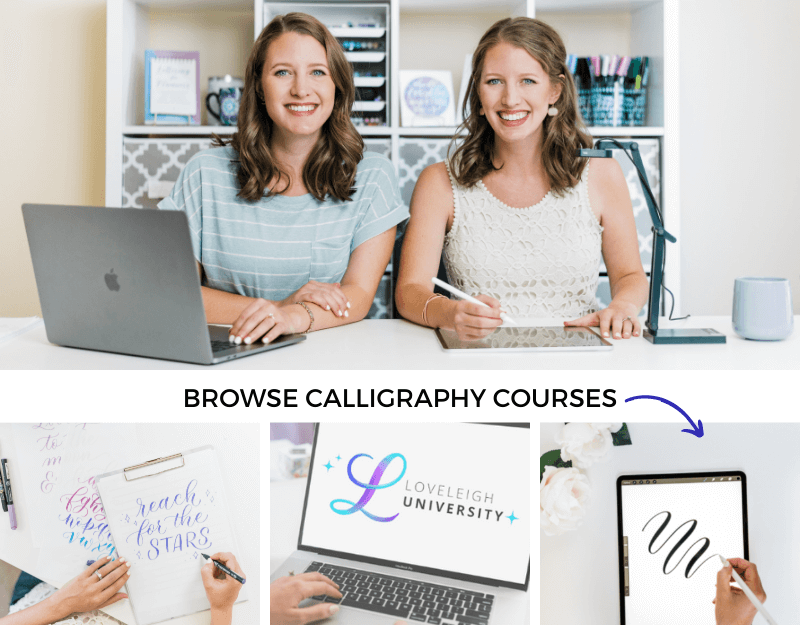
We’re Jordan (left) and Jillian (right) and we’re SO excited that you’re here to learn Procreate calligraphy with us!
Table of Contents
What is Procreate?
Procreate is a digital illustration software that’s available exclusively on Apple devices. In order to use the full Procreate app, you must have an iPad. The full version of Procreate used to be available for both iPad and iPhone, but now you can only install Procreate on iPad. For iPhone users, there’s a Procreate-lite version called Procreate Pocket. However, there are Procreate alternatives that Android users can explore.
Can Procreate be used for calligraphy?
Yes, Procreate is the #1 recommended program for digital calligraphy. While there are Procreate alternatives, nothing meets the precision, breadth and number of settings of Procreate. For a very affordable one-time payment, Procreate is a small investment that will be used by both digital lettering beginners and professional illustration artists.
However, not just any Procreate lettering brush will work for learning digital calligraphy. You need a brush that can accommodate the thin upstrokes and thick downstrokes that’s characteristic of calligraphy.
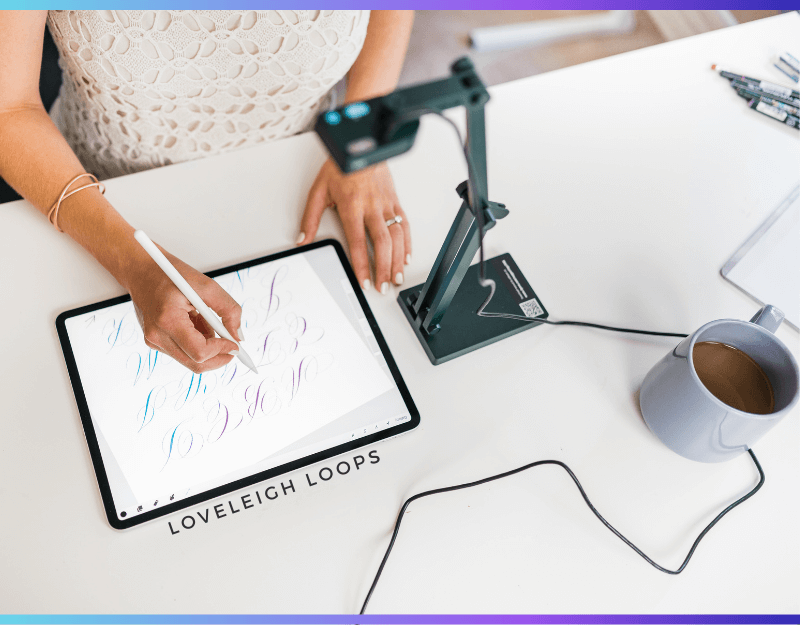
Example of Procreate lettering that you can learn
Why Learn Digital Lettering
Which type of digital lettering student are you: are you brand new to calligraphy and hand lettering, or are you a paper calligrapher who’s taking things digital?
Whichever path you’re on, there’s no right or wrong way to get into Procreate calligraphy and lettering. You can learn calligraphy from scratch with an iPad, or convert from paper to digital.
Digital lettering and calligraphy illustrations have exploded on social media, and the benefits are plentiful:
Even if you love traditional calligraphy (like we do!) it’s nice to have the option to leave the calligraphy pen, ink and paper at home and travel light with just digital lettering supplies.
Have instant access to download thousands of different Procreate brushes and settles at your fingertips.
Digital lettering makes it so easy to experiment with different calligraphy styles, tools and textures on a creative whim.
As long as you’re willing to keep practicing, your iPad lettering can keep advancing. Scale from being a total beginner to a professional without having to keep spending more money on supplies!
Procreate lettering and calligraphy comes with a learning curve, but resist feeling overwhelmed. Once you move through the fundamentals, you’ll be shocked at how quickly you learn! Let’s start with some of the vocabulary basics.
What is the best Procreate brush for calligraphy?
The best Procreate brush for calligraphy for beginners is the free Loveleigh Brush. This is a pressure-sensitive brush that’s specifically designed for you to easily get thin upstrokes and thick downstrokes, even if it’s your first time trying Procreate calligraphy.
It’s also multicolored, which you can customize inside Procreate. The color changes based on the pressure applied.
While there are many free brushes pre-loaded in Procreate, they’re not designed for calligraphy. For the best experience learning as a beginner, download our free Procreate calligraphy brush here:
Free Procreate Calligraphy Brushes
There are tens of thousands of free Procreate brushes online, but most aren’t made for calligraphy. Get instant access to our free Loveleigh Brush now, which is sized perfectly for thick downstrokes and thin upstrokes.
The color also changes with the amount of pressure applied, which creates additional contrast between strokes. Thin upstrokes are blue and thick downstrokes are purple, which really elevates everything that you write.
Doing calligraphy in Procreate is so satisfying!
Once downloaded, you can customize the colors within Procreate. If you’re unsure how to navigate the color change settings, we recommend that you take our free iPad Calligraphy Basics course.
You may also like: Procreate Shortcuts Cheat Sheet
What do you need for Procreate calligraphy?
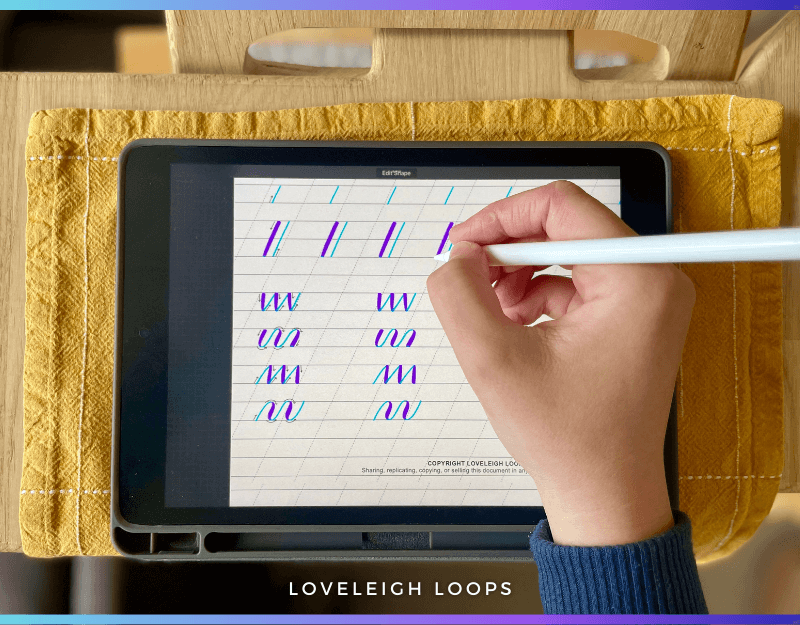
To practice Procreate calligraphy, the bare minimum tools are the Procreate App, an Apple Pencil, and an iPad, iPad Mini or iPad Pro that’s compatible with the Apple Pencil (specific models listed below). Beginners should also use a Procreate calligraphy brush and practice using iPad practice sheets.
Procreate App:
Procreate App in the App Store
An iPad’s ability to do calligraphy lies in whether or not it’s compatible with the Apple Pencil. Any iPad that syncs with the Apple Pencil can be used for digital calligraphy.
Apple Pencil:
Per Apple’s specs, the Apple Pencil 1st generation is compatible with these iPad models:
iPad mini (5th gen.)
iPad (6th gen. and later)
iPad Air (3rd gen.)
iPad Pro 12.9-inch (1st and 2nd gen.)
iPad Pro 10.5-inch
iPad Pro 9.7-inch
And the Apple Pencil 2nd generation is compatible with these iPad models:
iPad mini (6th gen.)
iPad Air (4th gen. and later)
iPad Pro 12.9-inch (3rd gen. and later)
iPad Pro 11-inch (1st gen. and later)
Note that iPad models don’t share compatibility with both pencil generations, so you have to buy the right one for your device.
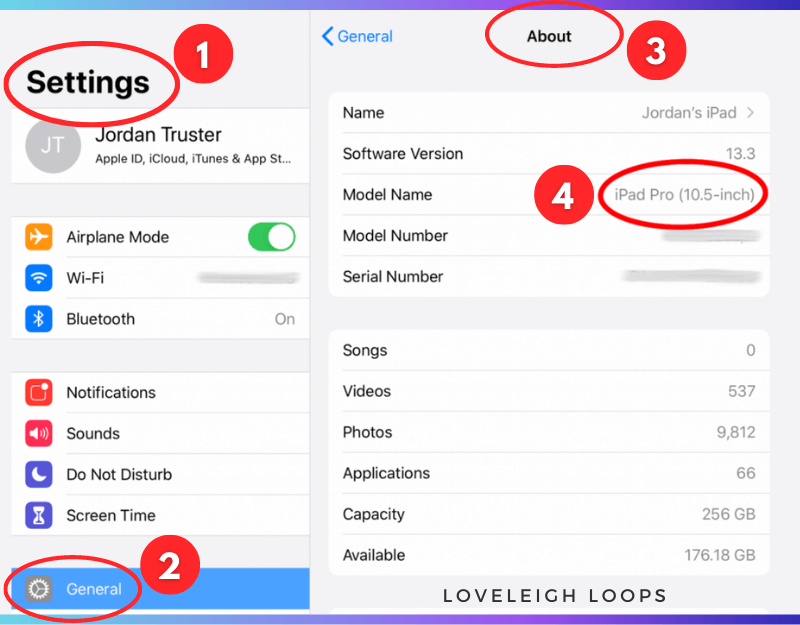
To find out which iPad you have, follow these steps:
Open the Settings App
Select General
Select About
See Model Name
See which model you have and then check the list to see if it’s compatible with the Apple Pencil.
The following are the most recent iPad models that support the Apple Pencil and can be used for iPad lettering:
You may also like: The Best iPads For Digital Calligraphy
You can technically start doing iPad calligraphy with just an iPad, Apple Pencil and Procreate, but beginners should also download…
Can you do iPad calligraphy with any stylus?
Almost no Apple Pencil alternatives are suitable for iPad calligraphy. We’re bargain shoppers as much as anyone so we’ve already done the research: you don’t actually save any money buying a generic stylus.
In order to do iPad calligraphy, you need your stylus to have pressure sensitivity. This refers to the ability to get thicker lines when you press down harder while writing.
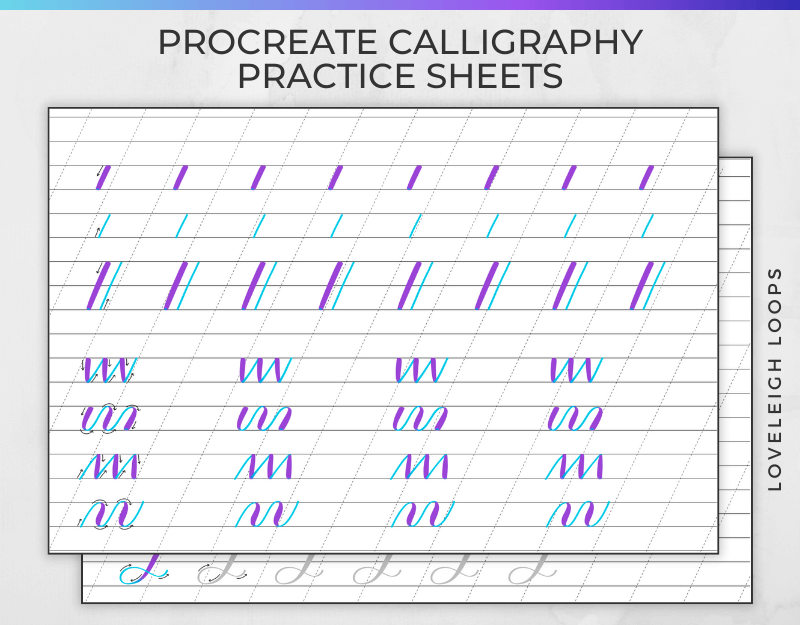
You can see the difference here on our free Procreate calligraphy practice sheets:
A common misunderstanding is that pressure sensitivity lies within the tablet settings, but it actually comes down to the stylus.
Most generic brand alternatives don’t include pressure sensitivity, which makes them impossible to do calligraphy with.
For example, the most popular generic-brand Apple Pencil on Amazon appears to be pressure-sensitive at first glance, but if you read the fine print you see that there is no pressure sensitivity:
It’s easy to misinterpret this product listing. Be aware that you’re looking specifically for pressure sensitivity.
It doesn’t mean that this isn’t a quality product! It's just not compatible with doing calligraphy.
It’s easy to make a purchasing mistake when trying to save some money on your stylus. Apple even sells Apple Pencil alternatives on their website that aren’t pressure-sensitive. You have to be very thorough in your research.
In the name of due diligence, we did find one pressure-sensitive Apple Pencil alternative: the Adonit Note+. But on Amazon the price of the Apple Pencil 1st Generation was reduced from $100 to $70, making them the same price.
The price of the original Apple Pencil and the Adonit Note+ at exactly the same.
With the right tools in hand, your Procreate calligraphy journey is just beginning!
You may also like: Top iPad Accessories for Calligraphers
Procreate Calligraphy Practice Sheets
Progressing at Procreate calligraphy without using iPad practice sheets is almost impossible. Don’t skip this step in the beginning, or you risk getting frustrated with unstructured practice. Download basic strokes practice sheets and start working your way through the basic strokes.
These iPad calligraphy practice sheets AND a video tutorial come with the free iPad Calligraphy Basics course.
How do you practice calligraphy in Procreate?
Practicing calligraphy in Procreate starts with using the right brush and beginner practice sheets. Start by practicing the basic strokes and get comfortable assembling letters piece by piece.
Here’s your Procreate practice ingredient list:
Procreate calligraphy brush
iPad practice sheets
Video tutorials explaining how to develop good technique
Get all of this in our free iPad Calligraphy Basics course.
Digital Calligraphy Versus Traditional Calligraphy
The term “Procreate calligraphy” can broadly encompass different types of digital lettering: modern calligraphy, digital hand lettering, modern lettering style, etc.
Any calligraphy lettering done on an iPad belongs under the umbrella of modern calligraphy, given the use of modern tools. However, you can still produce calligraphy that looks traditional with the use of the right Procreate brushes and execution.
Although you can emulate traditional calligraphy styles using modern tools, any calligraphy done in Procreate will still fit with the modern calligraphy. Styles such as Copperplate and the Spencerian style can be imitated with Procreate, but are traditionally done with a pointed pen and ink on paper. Find our Spencerian Procreate Brush here.
When it comes to style, the primary difference between modern calligraphy and traditional calligraphy lies in the individual creative liberties. Traditional calligraphy is meant to be controlled, disciplined and precise.
Pictured here are the calligraphy capital letters
You may also like: Modern vs Traditional Calligraphy
Modern calligraphy focuses on personal expression, experimentation and individual style.
Thanks to advanced Procreate brushes, any type of modern calligraphy can be produced digitally in Procreate:
Brush pen calligraphy
Pointed pen calligraphy
Bounce lettering
Ribbon lettering
Flourishing
and more.
You may also like: Beginner’s iPad Flourishing Tutorial
Given the lack of inkwells, physical brush pens, and stacks of paper, it’s very easy to get started with digital calligraphy. The ease is the biggest factor in its popularity, and with a little background and understanding of Procreate’s settings, you’ll find yourself getting acquainted very quickly.
Procreate Calligraphy And Lettering Video Tutorials
Styles, textures, opacity, layers - it’s a lot to take in! Don’t let the number of Procreate settings overwhelm you. Start by solving one problem at a time and you’ll learn everything naturally.
Pro tip: Every Procreate tutorial comes with screenshots AND a video, so choose which style suits your learning best!
How to Add Text in Procreate
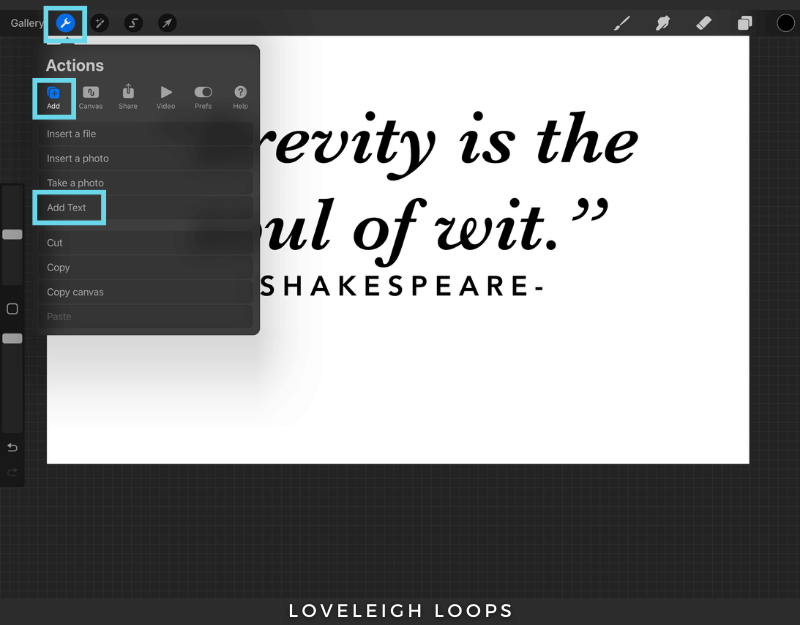
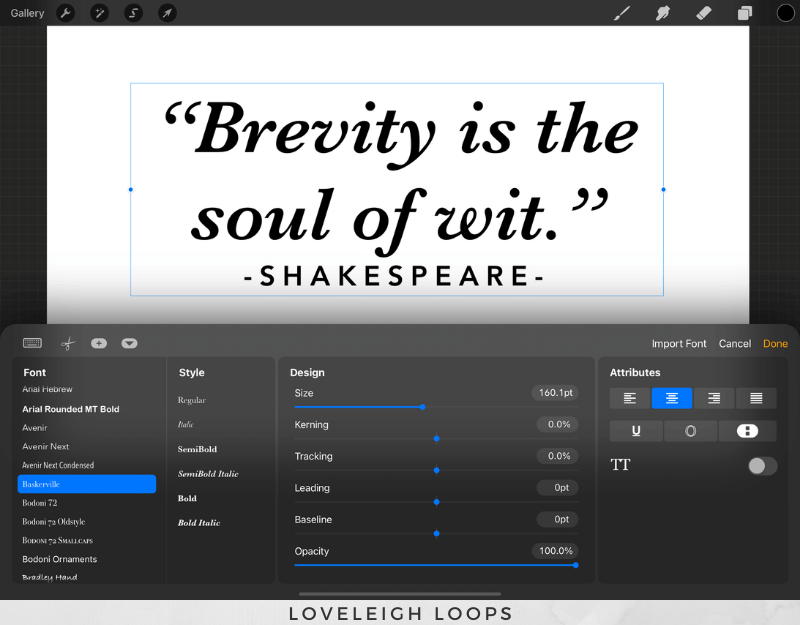
To add text in Procreate, tap Actions (the wrench icon) > Add > Add Text.
A box containing the word Text will appear in your active color. Use the keyboard to type.
Resize the bounding box to change the shape of the container.
To select a different font or adjust the size options, double tap your Text to highlight it, then tap on the font name that appears in the pop-up box to open Style options.
You may also like: Procreate Lettering Prompts
Double tap on a single word within a textbox to highlight it to change the attributes of just that word.
Tap on Done to apply all of the changes or Cancel to discard all.
Tap the Arrow tool to move, flip, resize, or rotate the textbox. Text is created in an editable vector format so that you can change the size, rotation and opacity and still re-type or edit your text.
The Layer thumbnail will show the letter ‘A’ if your text is still editable. To edit it, tap the Layer and choose Edit Text.
To change the color of text within a textbox, simply select the text layer, tap on your active color, and choose a different color.
Here are some other editing options:
Baseline: The baseline is the invisible line on which the text sits.
Kerning: The spacing between the individual pairs of letters.
Leading: The spacing between every line of text in a text block.
Tracking: The spacing between every single letter in a block of text.
Opacity: Another word for transparency. This setting makes your elements see-through.
Alignment: Align your text block left, right, centered or justified (text stretching from left to right).
Underline: The button with an underlined “U” adds a stroke underneath your text.
Outline: The button with an outlined “O” changes a solid font to an outlined version.
Text Direction: The to the right of Outline changes your letters to be stacked on top of one another.
Capitalization: The toggle at the bottom showing “TT” changes your text to full capitalization.
Outside of the Text Edit tool, you can edit your text layers just as you would any other layer. Some adjustments rasterize your text, meaning that it’s no longer editable as typeable text. This allows you to paint and add image adjustments such as blur. Once you rasterize your text, the change is permanent.
You may also like: How To Print From Procreate
How to use Alpha Lock in Procreate
Translation: How to recolor certain areas of your artwork
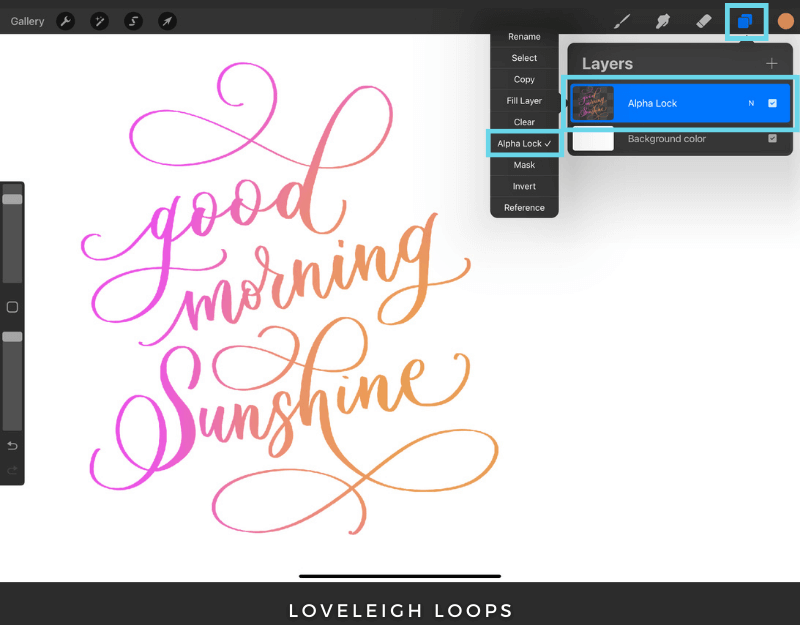
If you want to recolor work that you’ve already created on a layer, you can use Alpha Lock. Tap on the layer name and choose Alpha Lock from the pop-out menu. (A shortcut is to swipe right with 2 fingers on the layer name.) You’ll see a checkerboard pattern on the Layer Thumbnail.
Now when you paint on the layer, the pigment can only be added where the existing pixels are. To fill the entire area with a new color, select a color, tap the layer name, and choose Fill Layer.
Turn off Alpha Lock by tapping the Layer Name and unchecking Alpha Lock or using the 2-finger right-swipe shortcut. Once Alpha Lock is disabled, you can paint on the layer as normal.
How to Use Clipping Masks in Procreate
Translation: How to add an effect to your work in a certain area in a non-permanent way
When using a clipping mask, the shape of one layer (the base layer) controls how another layer (the layer above it) appears. You can think of it as fitting one texture, letter, drawing, color, or image inside the shape of another.
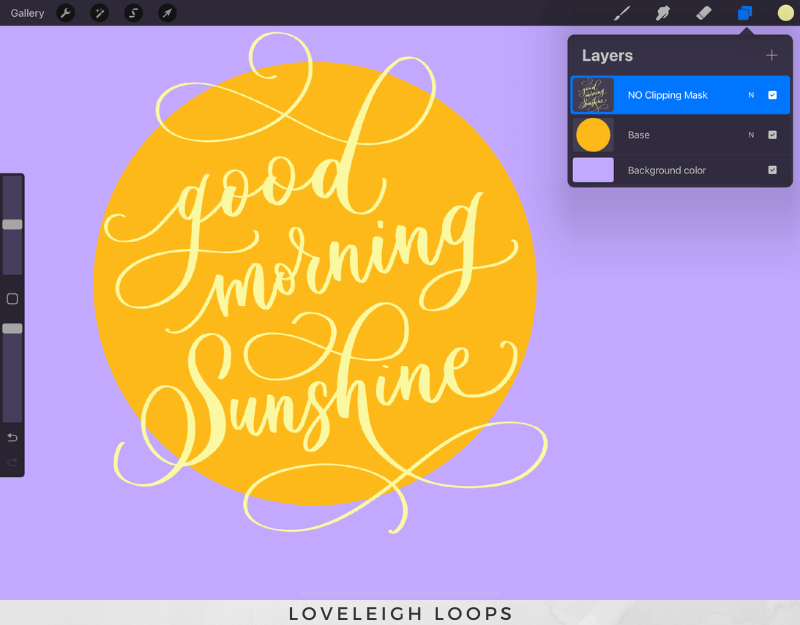
First, you need a base layer. The base layer defines the boundaries of the layer clipped to it. In this example, the circle is the base layer:
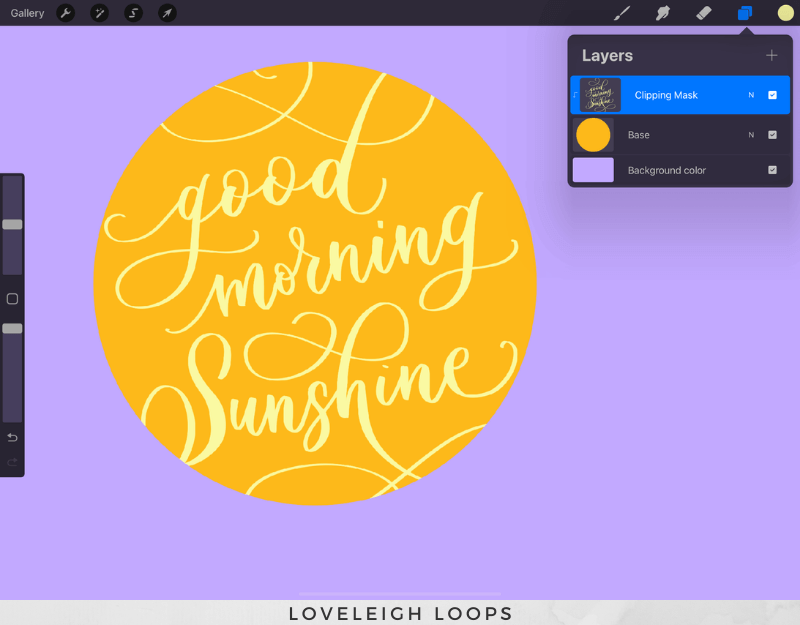
Then, you can turn the layer above it, in this case the calligraphy, into a clipping mask so that the letters fit inside the shape of the circle. Just tap the lettering layer and choose Clipping Mask from the pop-out menu:
Looking closely at your Layers panel, you’ll see a downward arrow next to the layer name. This signifies that the layer is linked to the base layer via clipping mask.
Why not just use alpha lock or make changes directly to the layer? The answer: Clipping masks allow you to adjust each element separately. In this example, you can move the lettering around, recolor it, rotate it, or change the blend mode, and it will still fit into the base circle shape.
You can also change the color, position, or shape of the circle, and the letters will fit within the new shape.
Stack multiple clipping masks on top of one another linked to the same base layer to create even more effects.
Release a clipping mask by tapping on the layer and unchecking Clipping Mask. If you do this to a stacked clipped layer, it will also release any clipping masks above it.
Alpha Lock vs Clipping Masks in Procreate
The alpha lock version shown above was created on a single layer, so the two elements (pink letters and orange gradient) one can no longer be edited separately. In the clipping mask version, the pink base lettering is on a separate layer from the orange gradient, and either one can separately change position, color, blend mode, and more while remaining linked together.
While they can achieve the same result, we tend to use clipping masks over alpha lock because clipping masks allow you to experiment in a non-permanent way. If you don’t like a change, you can always adjust or delete the clipping mask layer later on, whereas alpha lock is much less flexible.
If you need a single layer for whatever reason, you can always merge together the separate clipping mask layers into one, but you can’t reverse alpha lock into separate layers.
The main instance of when we’d use alpha lock over a clipping mask is to change from one solid color to another (and sometimes we still use clipping masks for this anyway in case we change our mind!).
How to Group and Ungroup Layers in Procreate
Grouping allows you to group together multiple layers to keep your project organized, show/hide related layers with one tap, and even transform multiple layers simultaneously.
To create a layer group, tap one layer to select it, then swipe right on one or more other layers. Tap the Group button that appeared in the top right of the Layers panel.
To add a layer into an existing group, drag that layer within the group. You can tell which layers are within a group by how far they are indented.
Once you have created a group, tap the words “New group” to rename it. Tap the arrow next to the name to collapse or expand the list of layers within it.
Tap the checkbox to show or hide all the layers within the group simultaneously.
Create a group of groups by selecting one group, swiping right on another group, and choosing “Group”. This puts both inside of one parent group.
To release a single layer from a group, tap and drag that layer outside of the group, above or below it in the layer list. Move multiple layers by selecting one, swiping right on the other(s), and dragging them outside of the group. There is currently no “ungroup” option.
To merge all the layers within a group onto a single layer, tap the group name and choose Flatten. Flattening is final; you can no longer separate them, unless you choose “Undo”.
You may also like: How To Adjust Procreate Brush Size (video)
How to Merge and Unmerge Layers in Procreate
Merging combines two separate layers into one. Simply drag the layers so that one is on top of the other in the list of Layers. Tap the topmost layer and choose Merge Down. A shortcut is to squeeze the layer names together with two fingers.
Merge multiple layers by squeezing two layers that have one or more layers in between. The new layer will be named whatever the bottom-most layer was named.
You cannot separate two merged layers unless you press “Undo” immediately.
So, only merge two layers if you’re running out of layers in your project, or if you want to be able to edit the two layers at the same time.
If the elements are not overlapping, you can cut/paste a selection of the layer onto its own layer, effectively “unmerging” the layers. This requires manually selecting the area, swiping down with 3 fingers, and choosing “Cut and Paste.”
How to Create Folders (Stacks) of Artwork in Procreate
Organize your gallery by putting artwork into groups or folders, called Stacks. Tap and hold an artwork then Drag and Drop it on top of the one you want to group it with.
To stack multiple projects, tap Select from the top right menu, tap on each of the artworks, then choose Stack.
Tip: Make a cover photo for each stack to stay even more visually organized. Drag and drop the cover photo artwork onto the stack, wait for a moment, and place the held artwork as the first in the list. The first artwork will show as the thumbnail for the stack
To move artwork out of a stack, tap, hold and drag it over the Stack return button to return it to the Gallery.
Rename a stack by tapping on the name “Stack” and typing a new name.
Tip: Preview an artwork by pinching and zooming into it. Swipe left and right to scroll through other projects. From the preview, double tap to open and edit a project.
How to Use Symmetry in Procreate
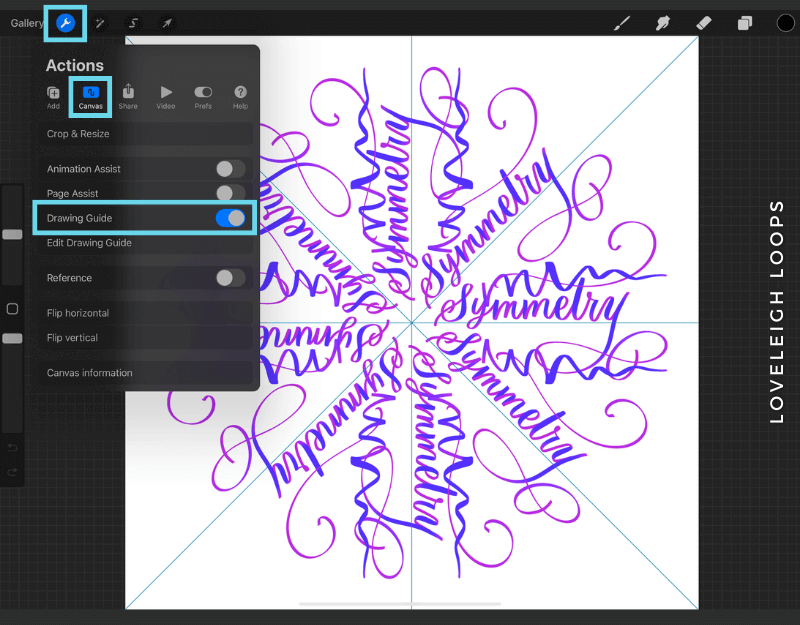
To turn on Symmetry, go to Actions (wrench icon) > Canvas > Drawing Guide > Edit Drawing Guide.
From the options, select Symmetry. Choose Done.
You’ll see a vertical line down the screen. Anything you paint on one side will automatically be replicated on the other side in real-time.
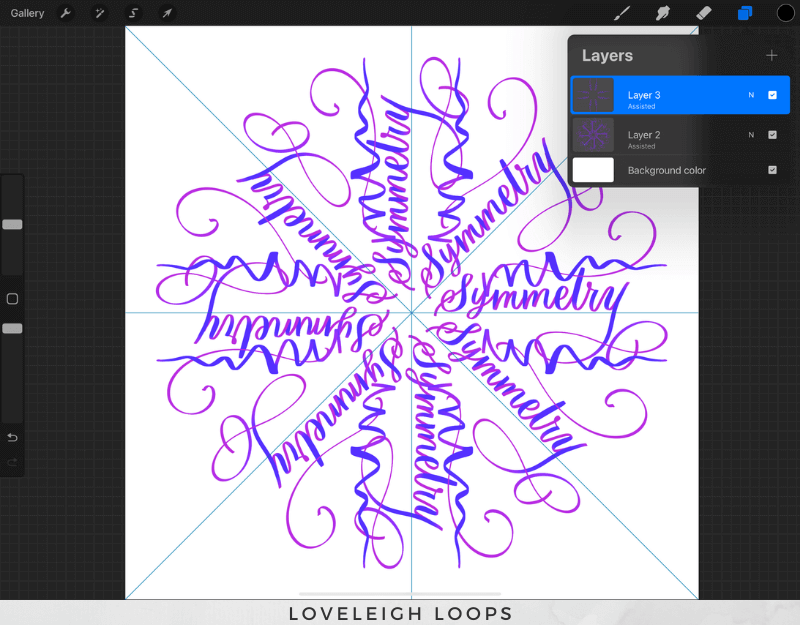
Notice that the layer says “Assisted” under the layer name. Drawing Assist is turned on by default. If you create a new layer, symmetry will not work; you need to tap the layer and choose Assisted Drawing from the pop-out menu.
By default, the guides are centered. You can reposition or rotate the guides with the nodes to create symmetry at an angle inside the Edit Drawing Guide.
Let’s look at mirrored vs. rotational. By default, Symmetry uses Mirror Symmetry to reflect your strokes across the guideline.
To toggle on Rotational Symmetry, toggle the button within the Symmetry options. In this mode, your strokes are rotated. Another way to think about rotational symmetry is that the strokes are reflected both horizontally and vertically at the same time.
The default symmetry mode is Vertical but you can choose other modes from the options list.
Choose different types of symmetry from the Options button. Definitions:
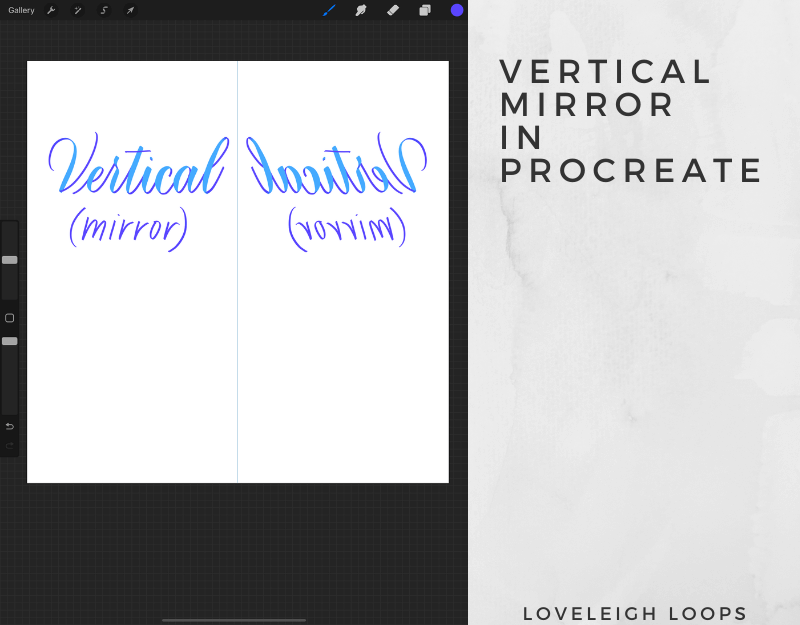
Vertical Symmetry: This puts a guideline vertically right down the middle of the canvas. What you draw on one side of the canvas will then be reproduced on the other side.
Example of vertical (mirror) symmetry in Procreate
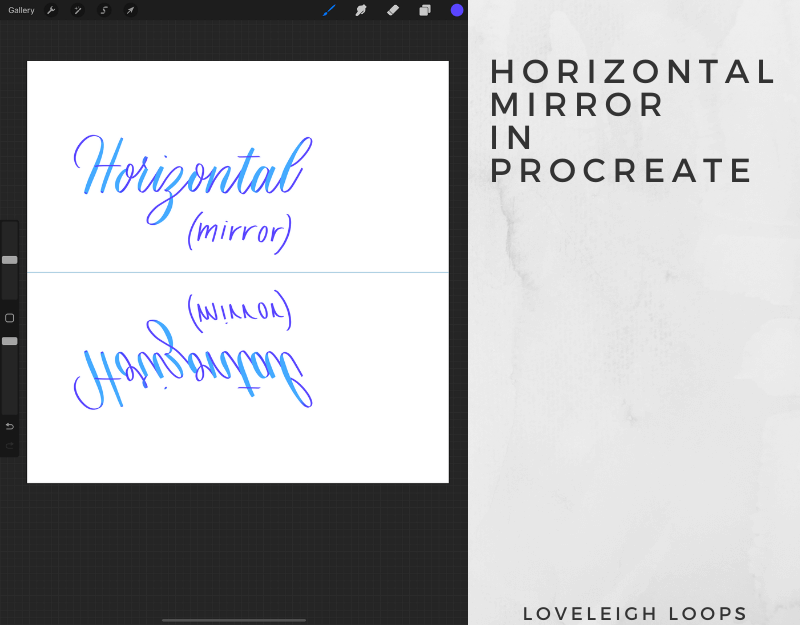
Horizontal Symmetry: This puts a guideline horizontally across the middle of the canvas. What you draw on one half will be reproduced on the other half.
Example of horizontal (mirror) symmetry in Procreate
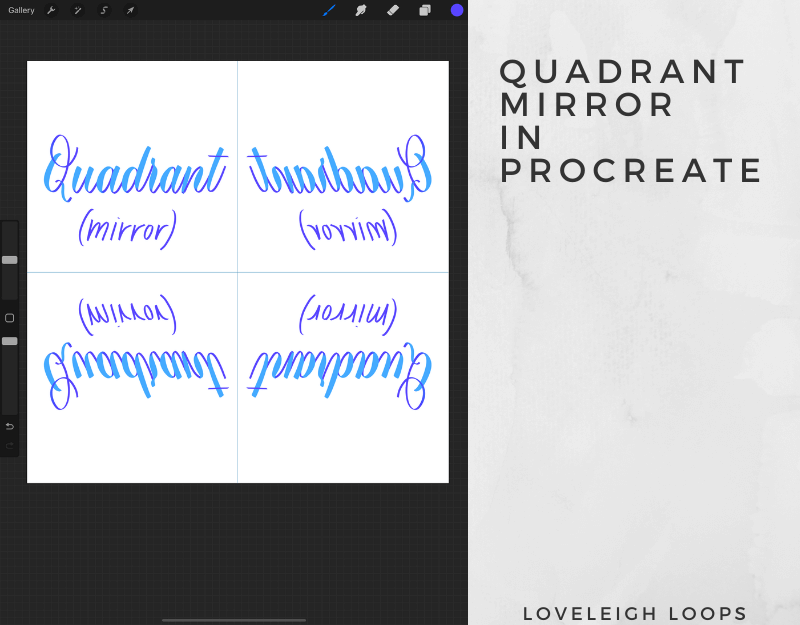
Quadrant Symmetry: This divides the canvas into 4 quadrants using both the horizontal and vertical guidelines. What you draw in 1 quadrant will be reproduced across all of the quadrants.
Example of quadrant (mirror) symmetry in Procreate
Radial Symmetry: This splits the canvas into 8 segments using vertical, horizontal and diagonal guidelines. What you draw in one segment will then be reproduced in all the others.
Example of radial mirror symmetry in Procreate
All of these modes work in both mirrored and rotational symmetry.
How to Use Blend Modes in Procreate
To change a layer blend mode, open the layers panel tap on the ‘N’ next to the Layer checkbox. This opens a list of blend mode options. ‘N’ stands for Normal blend mode, which is the default. The letter will change to reflect which blend mode you select, such as ‘M’ for Multiply.
Scroll through the list to see the effect of the blend mode in real-time. Scrolling up the list will give you all of the darkening effects. The blend modes right below Normal have effects that lighten the work, and the options towards the bottom of the list change other attributes like hue and saturation.
How does this work? It’s very technical but here’s a quick description. In digital art, colors are based on numerical values. Each blend mode is based on a mathematical formula, using these values. Read the following resources for the exact math:
But… rest assured that 99% of digital artists don’t have these formulas memorized (and likely aren’t even aware of them!). Most artists have a few of their favorite blend modes that they’ve learned from experimentation, and use those in their work.
A common blend mode is Multiply to create shadows or darkened areas. If you’re a student of Procreate Lettering Projects course, look for the blend mode cheat sheet to find our top 3 favorite blend modes for lettering and examples of when to use them.
Procreate Calligraphy Community
Don’t have any Procreate calligraphy friends living next door? Don’t worry; there are thousands of them on social media waiting to make your acquaintance.
iPad Calligraphy Community on Facebook
The most creative and welcoming digital letters on the internet are waiting for you inside our Procreate Facebook Community.
On your digital lettering journey, use this space to:
Ask questions
Receive helpful tips
Meet friends
Share your work
Get exclusive resources and offers
Procreate Lettering Community on Instagram
Instagram is bursting with stunning Procreate works, and beginners shouldn’t hesitate to join in the conversation. The Procreate community is very welcoming, supportive and helpful.
Post your first Procreate creation and ask for feedback or advice from the IG community. Use these hashtags to get inspired, join in the fun and get your posts noticed:
Tags so we can see what you post and cheer you on:
#LoveleighLoops
#LoveleighLetters
#LoveleighStyles
#ProcreateCalligraphy
#ProcreateLettering
#iPadLettering
#LetteringCommunity
#CalligraphersOfInstagram
Come meet your new hand lettering friends! Don’t be intimidated to post your work - everyone is waiting to cheer you on.
You may also like: How To Make Digital Lettering Look More Advanced
Procreate Calligraphy Online Courses
There are literally endless free Procreate resources for you on our blog and YouTube channel. But if you’d like a structured path from where you are now to being able to execute any idea you have, an online calligraphy course will streamline your learning.
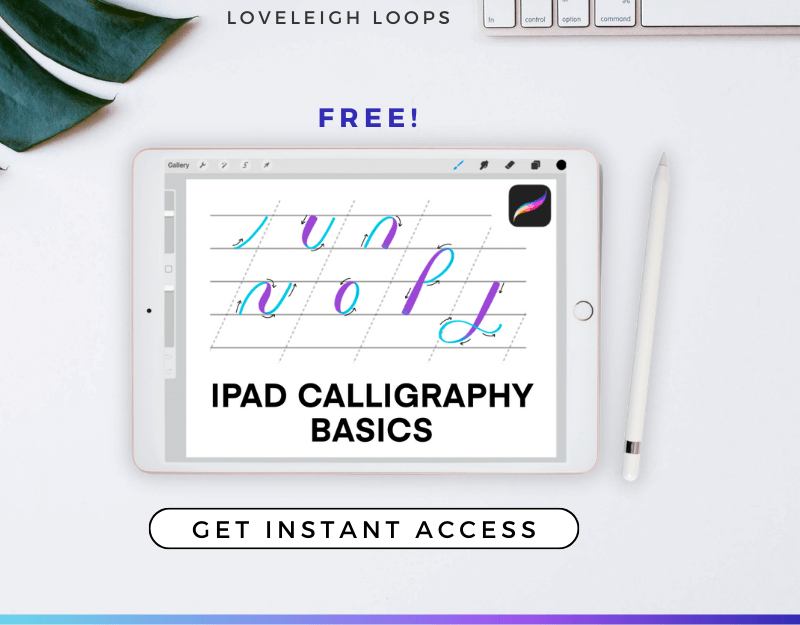
iPad Calligraphy Basics (FREE)
We believe that everyone should be able to start learning Procreate calligraphy and lettering for free to see if this style is for them.
This is a true beginner’s Procreate course: we’ll start at how to upload the included calligraphy Procreate brush and practice sheets, and will walk you through using Procreate for the very first time.
What you’ll learn:
How to import our custom calligraphy Procreate brush and practice sheets
How to navigate the layers to practice efficiently and re-use your sheets
Go from zero experience to doing the basic strokes
What students have said:
"I've already learned more in iPad Calligraphy Basics than I learned in a YEAR.”
Get started with the iPad Calligraphy Basics for free right now:
The ABCs of Procreate
Move beyond your basic strokes onto the alphabet and practice words with The ABCs of Procreate. This beginner Procreate course is perfect for beginners who want a strong grasp of the fundamentals.
What you’ll learn:
The lowercase calligraphy alphabet in Procreate
The uppercase calligraphy alphabet in Procreate
Practice using the included workbooks: lowercase workbook, uppercase workbook and practice words workbook
Bonus: lettering project
What students have said:
"The Procreate calligraphy brush in the ABC’s course has been a GAME changer for me.”
Join The ABCs of Procreate here:
Procreate Lettering for Beginners
In this enormous Procreate lettering resource, you’ll learn the basics of how to use Procreate for lettering all the way to advanced composition, effects and techniques.
What you’ll learn in Procreate Lettering for Beginners:
Beginner practice and basic Procreate settings and techniques
How to create advanced lettering compositions
Procreate brush lettering 101
Artistic decoration
Join Procreate Lettering for Beginners here:
Procreate Lettering Projects
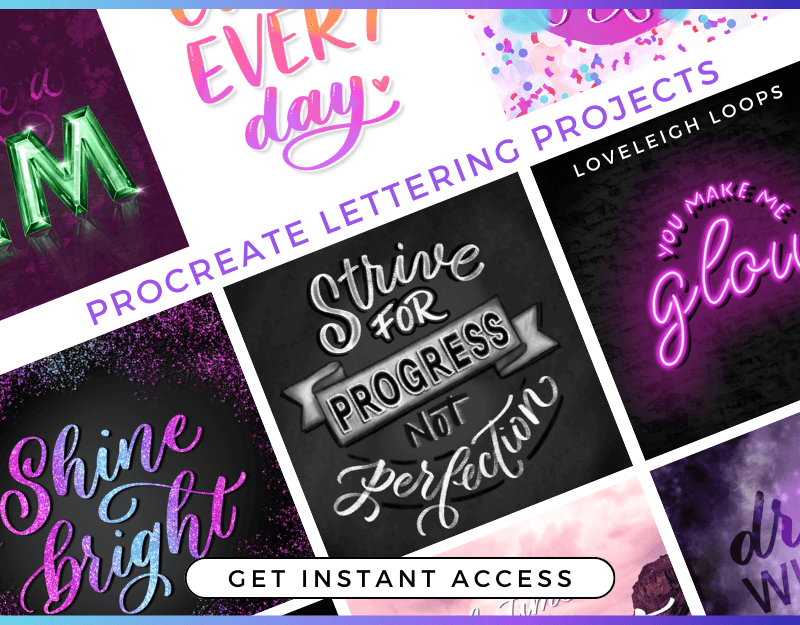
Go from basics to breathtaking with Procreate Lettering Projects.
This hand lettering and calligraphy course is for calligraphers who want to move beyond the basics and learn how to create lettering projects that are works of art.
What you’ll learn:
Text effects such as gradient lettering, neon text effects, perspective distortion and more (20 lettering effects total)
Walk through each project together, covering what to do AND common mistakes so that you never get stuck
Get bonus Procreate brushes and templates, plus a products kit
What students have said about Procreate Lettering Projects:
"I constantly rave about the Procreate Lettering Projects course! I tell everyone that they won’t regret it, it’s easy to follow and they will learn so much.”
Start creating hand lettering pieces right now:
How to Make Custom Procreate Brushes
Finally demystify the process of making your own Procreate brushes! Make every single brush in this Procreate brush pack from scratch with us, AND get the skills to navigate the Procreate brush studio settings so you can create any brush moving forward.
In this course, you’ll learn:
How to make 27 Procreate brushes from scratch
Why setting decisions were made, so you can apply to future Procreate brushes
Detailed breakdown of every single Procreate brush studio setting
What Custom Procreate Brush students have said:
“I've been wanting to do this for a long time, but that Procreate brush studio is intimidating. Thanks for making it easy!"
Never need to rely on free brushes again! Join our Procreate brushes courses here:
iPad Lettering Composition
Never struggle to turn a quote into a piece of hand lettering art again. Learn all of the Procreate settings, brushes, tools and techniques to be able to execute your creative vision.
In the iPad Lettering Composition course, you’ll learn:
General techniques needed to create a balanced hand lettering composition
Specific settings and tools within Procreate to achieve this
Work alongside us to create entire pieces of finished hand lettering art
Get started right now:
iPad Course Bundle
Get all of our Procreate calligraphy and lettering courses in one place with the iPad course bundle. This course collection is the whole Procreate calligraphy and lettering package.
Beyond just mastering the Procreate app and your lettering style, this course bundle also covers how to make money with Procreate by selling your own custom Procreate brushes.
If it’s your goal to turn your hand lettering into share-worthy art that leaves you bursting with pride, this is your single ticket to get there.
Next Steps
From all of the settings to the different digital calligraphy brushes and beyond, we know that Procreate calligraphy can be overwhelming at first.
Remember that every single person who shares gorgeous works of Procreate art started at zero, too. They learned, and now this is your opportunity to learn.
If you’re a total Procreate calligraphy beginner, start with our free iPad Calligraphy Basics Course to get started right now.
Your favorite hobby is waiting for you!
