
The Art of Copperplate Flourishing: Tips and Techniques
While you can make beautiful flourishes using any tool and style, there's a special magic to Copperplate calligraphy flourishing.
When you watch Copperplate flourishing videos on social media it looks easy and effortless, but behind those mesmerizing swirls are flourishing concepts and techniques that give it form and structure.
Pause now to pin! ↓

Need a Copperplate teacher to help you learn this dazzling technique? You've just found two. Hi, we're Jillian and Jordan *waving enthusiastically* the twin sisters and founders of Loveleigh Loops. We started doing calligraphy ourselves nearly 20 years ago, and we've been teaching the lettering arts for going on 10 years.

Jordan (left) and Jillian (right) - we’re so glad that you’re here!!
We are SO happy that you're here today because flourishing is one of our specialties. Let's pull back the curtain on this mystical feature of lettering so that you can learn our signature technique.
Let these helpful tips, examples and lessons be the inspiration you need to practice your own flourishes today.
Table of Contents
What Is Copperplate Calligraphy?
Copperplate calligraphy is a style of traditional hand lettering that was popular in the 17th and 18th centuries.
Named after the copper plates used in an old-fashioned printing press, this calligraphy style is known for its elegant lines and letters, and is still a popular style with calligraphers worldwide.

Basic Copperplate calligraphy written with a pointed pen
When you look a little more closely at the letters in this example, you'll see that the lines are not all equally thick. It's this contrast in thickness (and 55-degree slant), along with these particular letterforms, that makes Copperplate calligraphy instantly recognizable.
Copperplate Vs Modern Calligraphy
A quick comparison shows that the Copperplate examples are very different from the playful lettering found on greeting cards, Pinterest quotes and throw pillows. Copperplate is a traditional style, which has a focus on consistency.
The other example is modern calligraphy, which is in ways more creative, allowing the writer to experiment and challenge the rules.
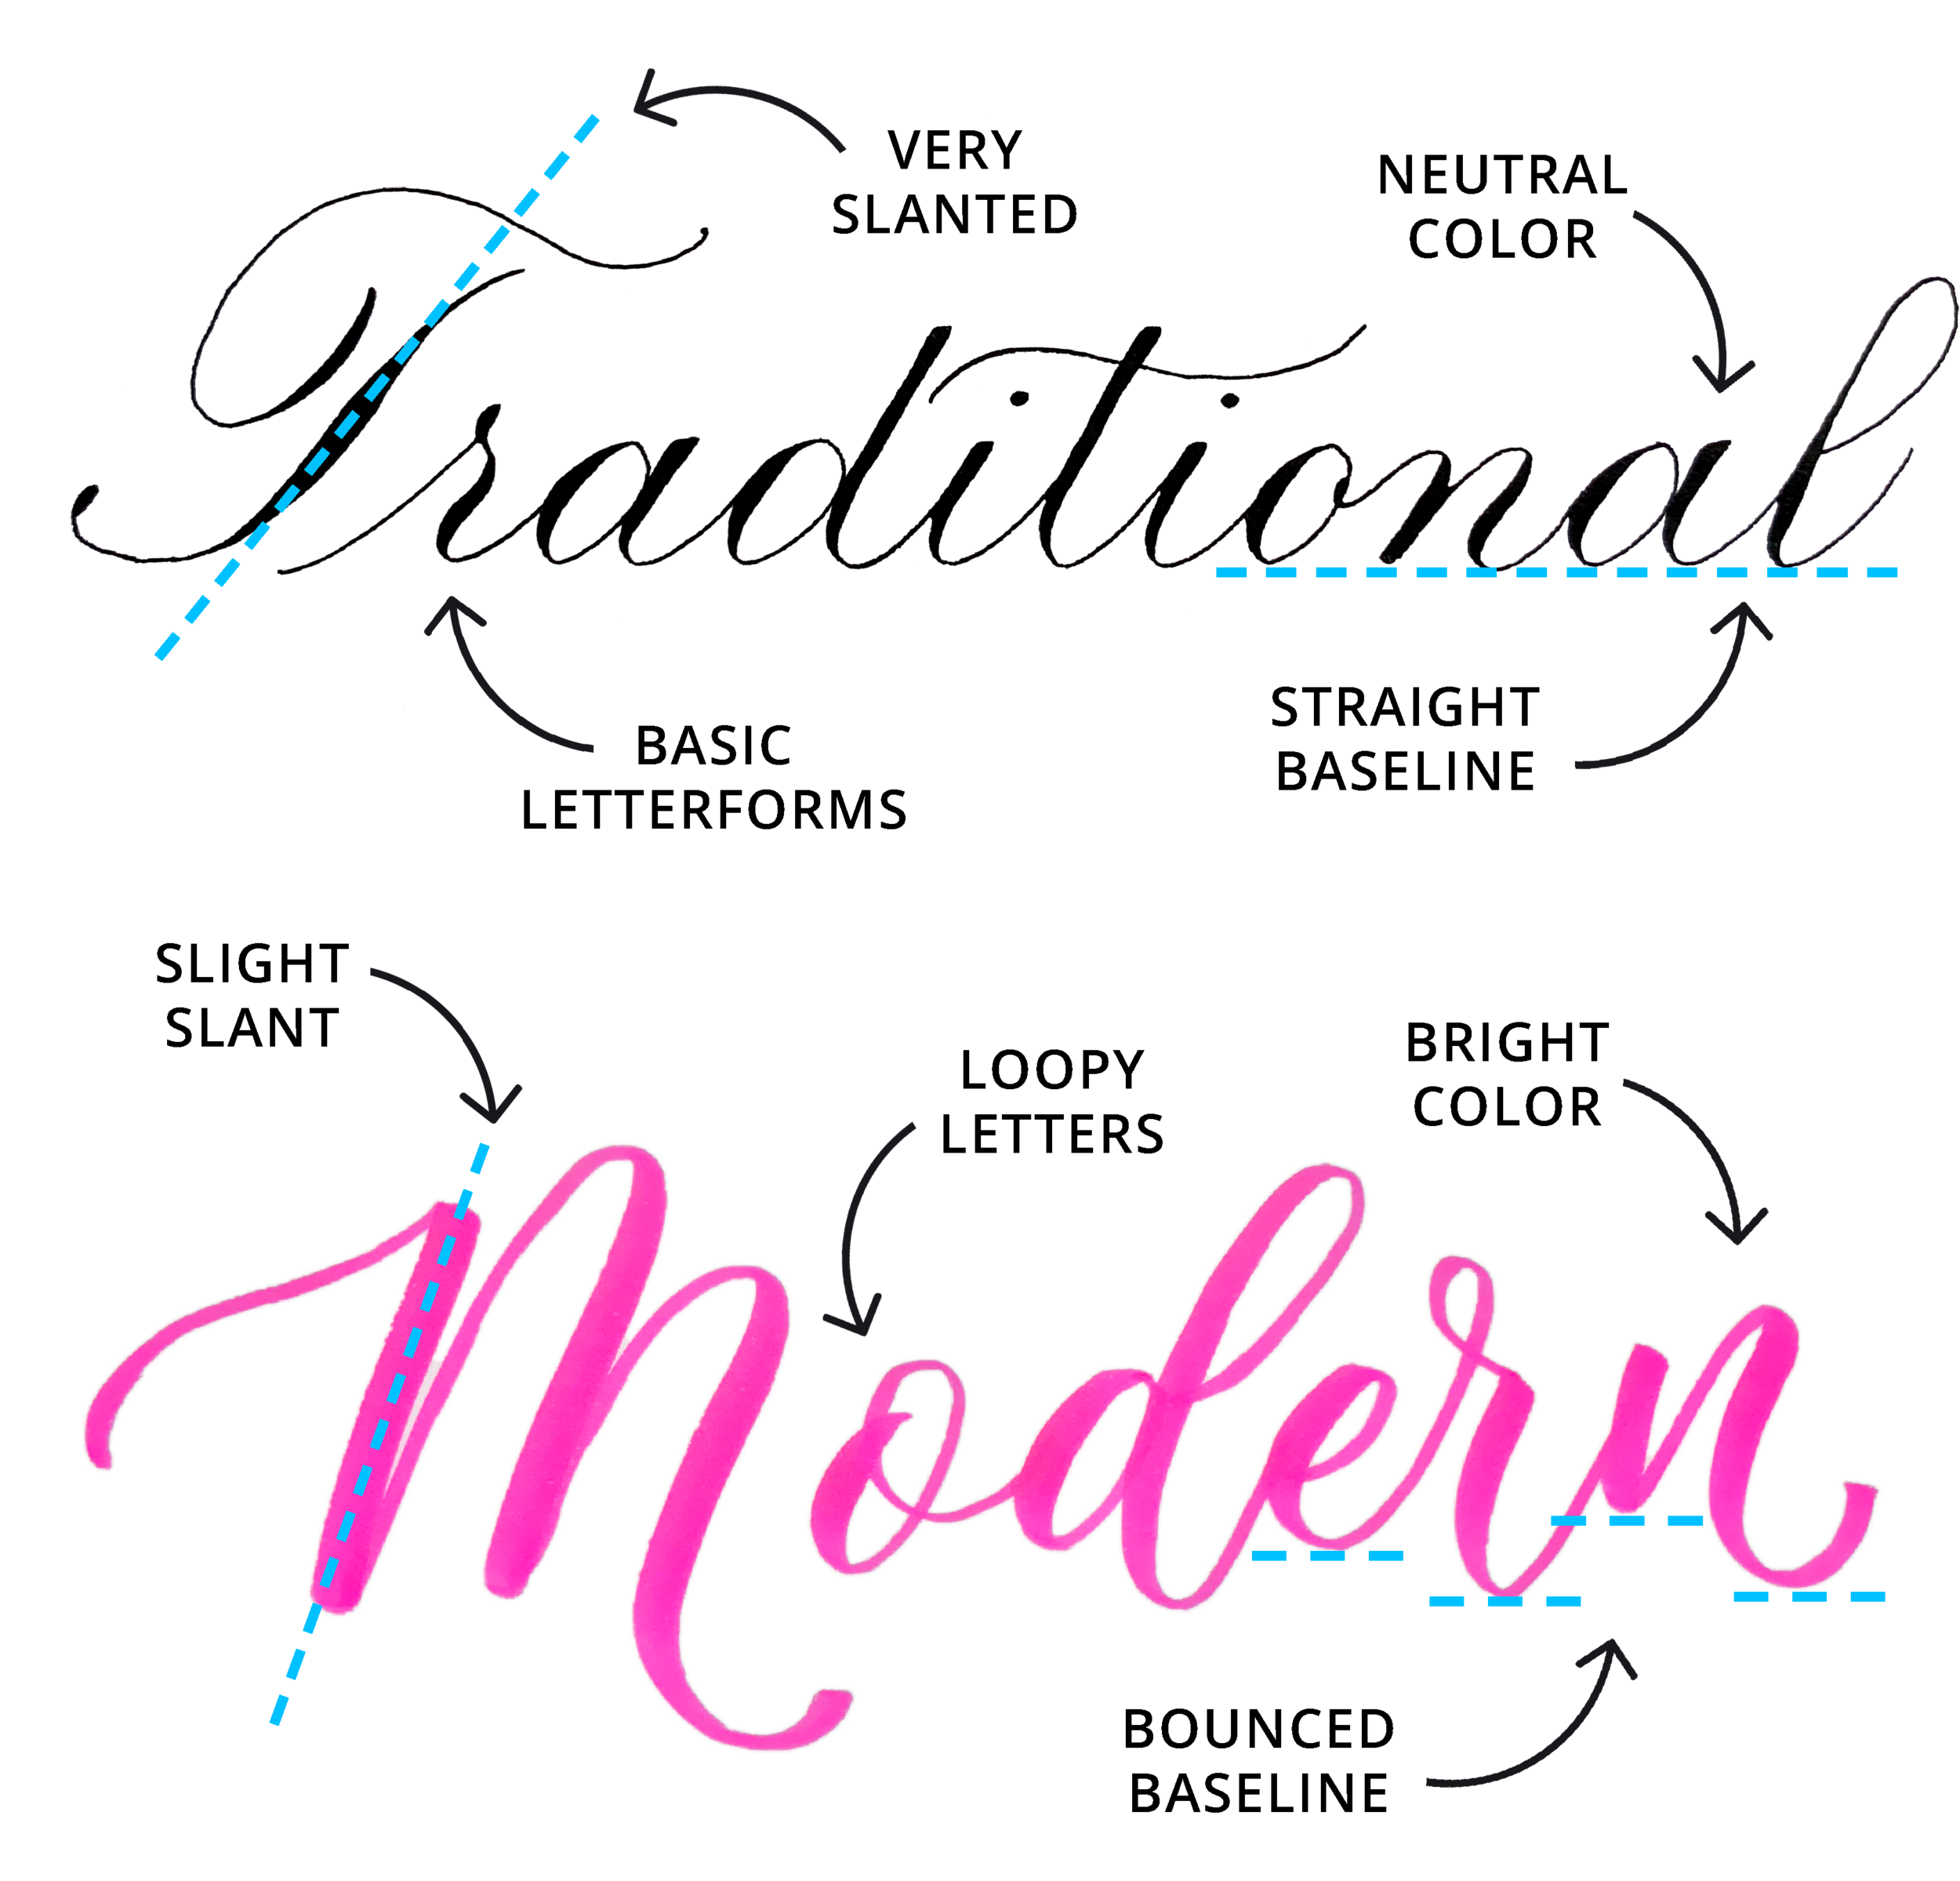
Traditional versus modern calligraphy
Modern calligraphy lets you play around with all the principles of calligraphy and decide which rules you want to keep and which to break. Things like size, color, proportions and even backgrounds can be seen as suggestions rather than rules.
Where modern calligraphy uses colorful letters, Copperplate generally uses black ink to create lettering that has a slightly more sophisticated feel to it. Being a traditional script, a Copperplate calligraphy artist aims to follow the rules and traditions of the style.
You may also like: Modern Bounce Lettering For Beginners
What Are Calligraphy Flourishes?
Calligraphy flourishes are elegant extensions that make a normal letter fancy and sophisticated. Flourishing creates variations of normal words, elevating the style and skill level.
Part of the fun of learning traditional calligraphy is coming up with your own unique shapes and variations to flourish a letter.
Each lettering artist has their own set of embellishments that they use in their calligraphy.
These embellishments are nothing new as they can be found in many historical pieces of Copperplate calligraphy.
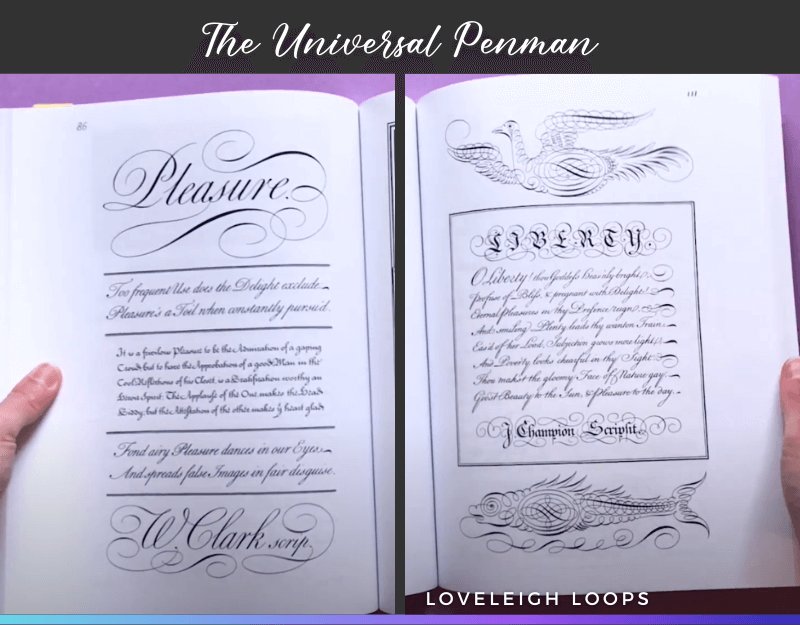
Examples of Copperplate calligraphy flourishing found in The Universal Penman
In this 18th-century example, the word Pleasure has a number of beautiful swirls, loops and curves that make it look fancy. While the base letters need to follow the rules, there are endless ways to flourish your letters and discovering what works for you. Flourishing is part of the fun of learning calligraphy.
Copperplate Calligraphy Flourishing Examples
A great way to become familiar with an introduction to Copperplate flourishing is seeing examples of what you can create. Watch a quote written in real-time:
Enjoy this 18th-century Copperplate flourishing is from the book The Universal Penman:

Source: George Bickham, Public domain, via Wikimedia Commons. We dive deeper into this book in our calligraphy book guide.
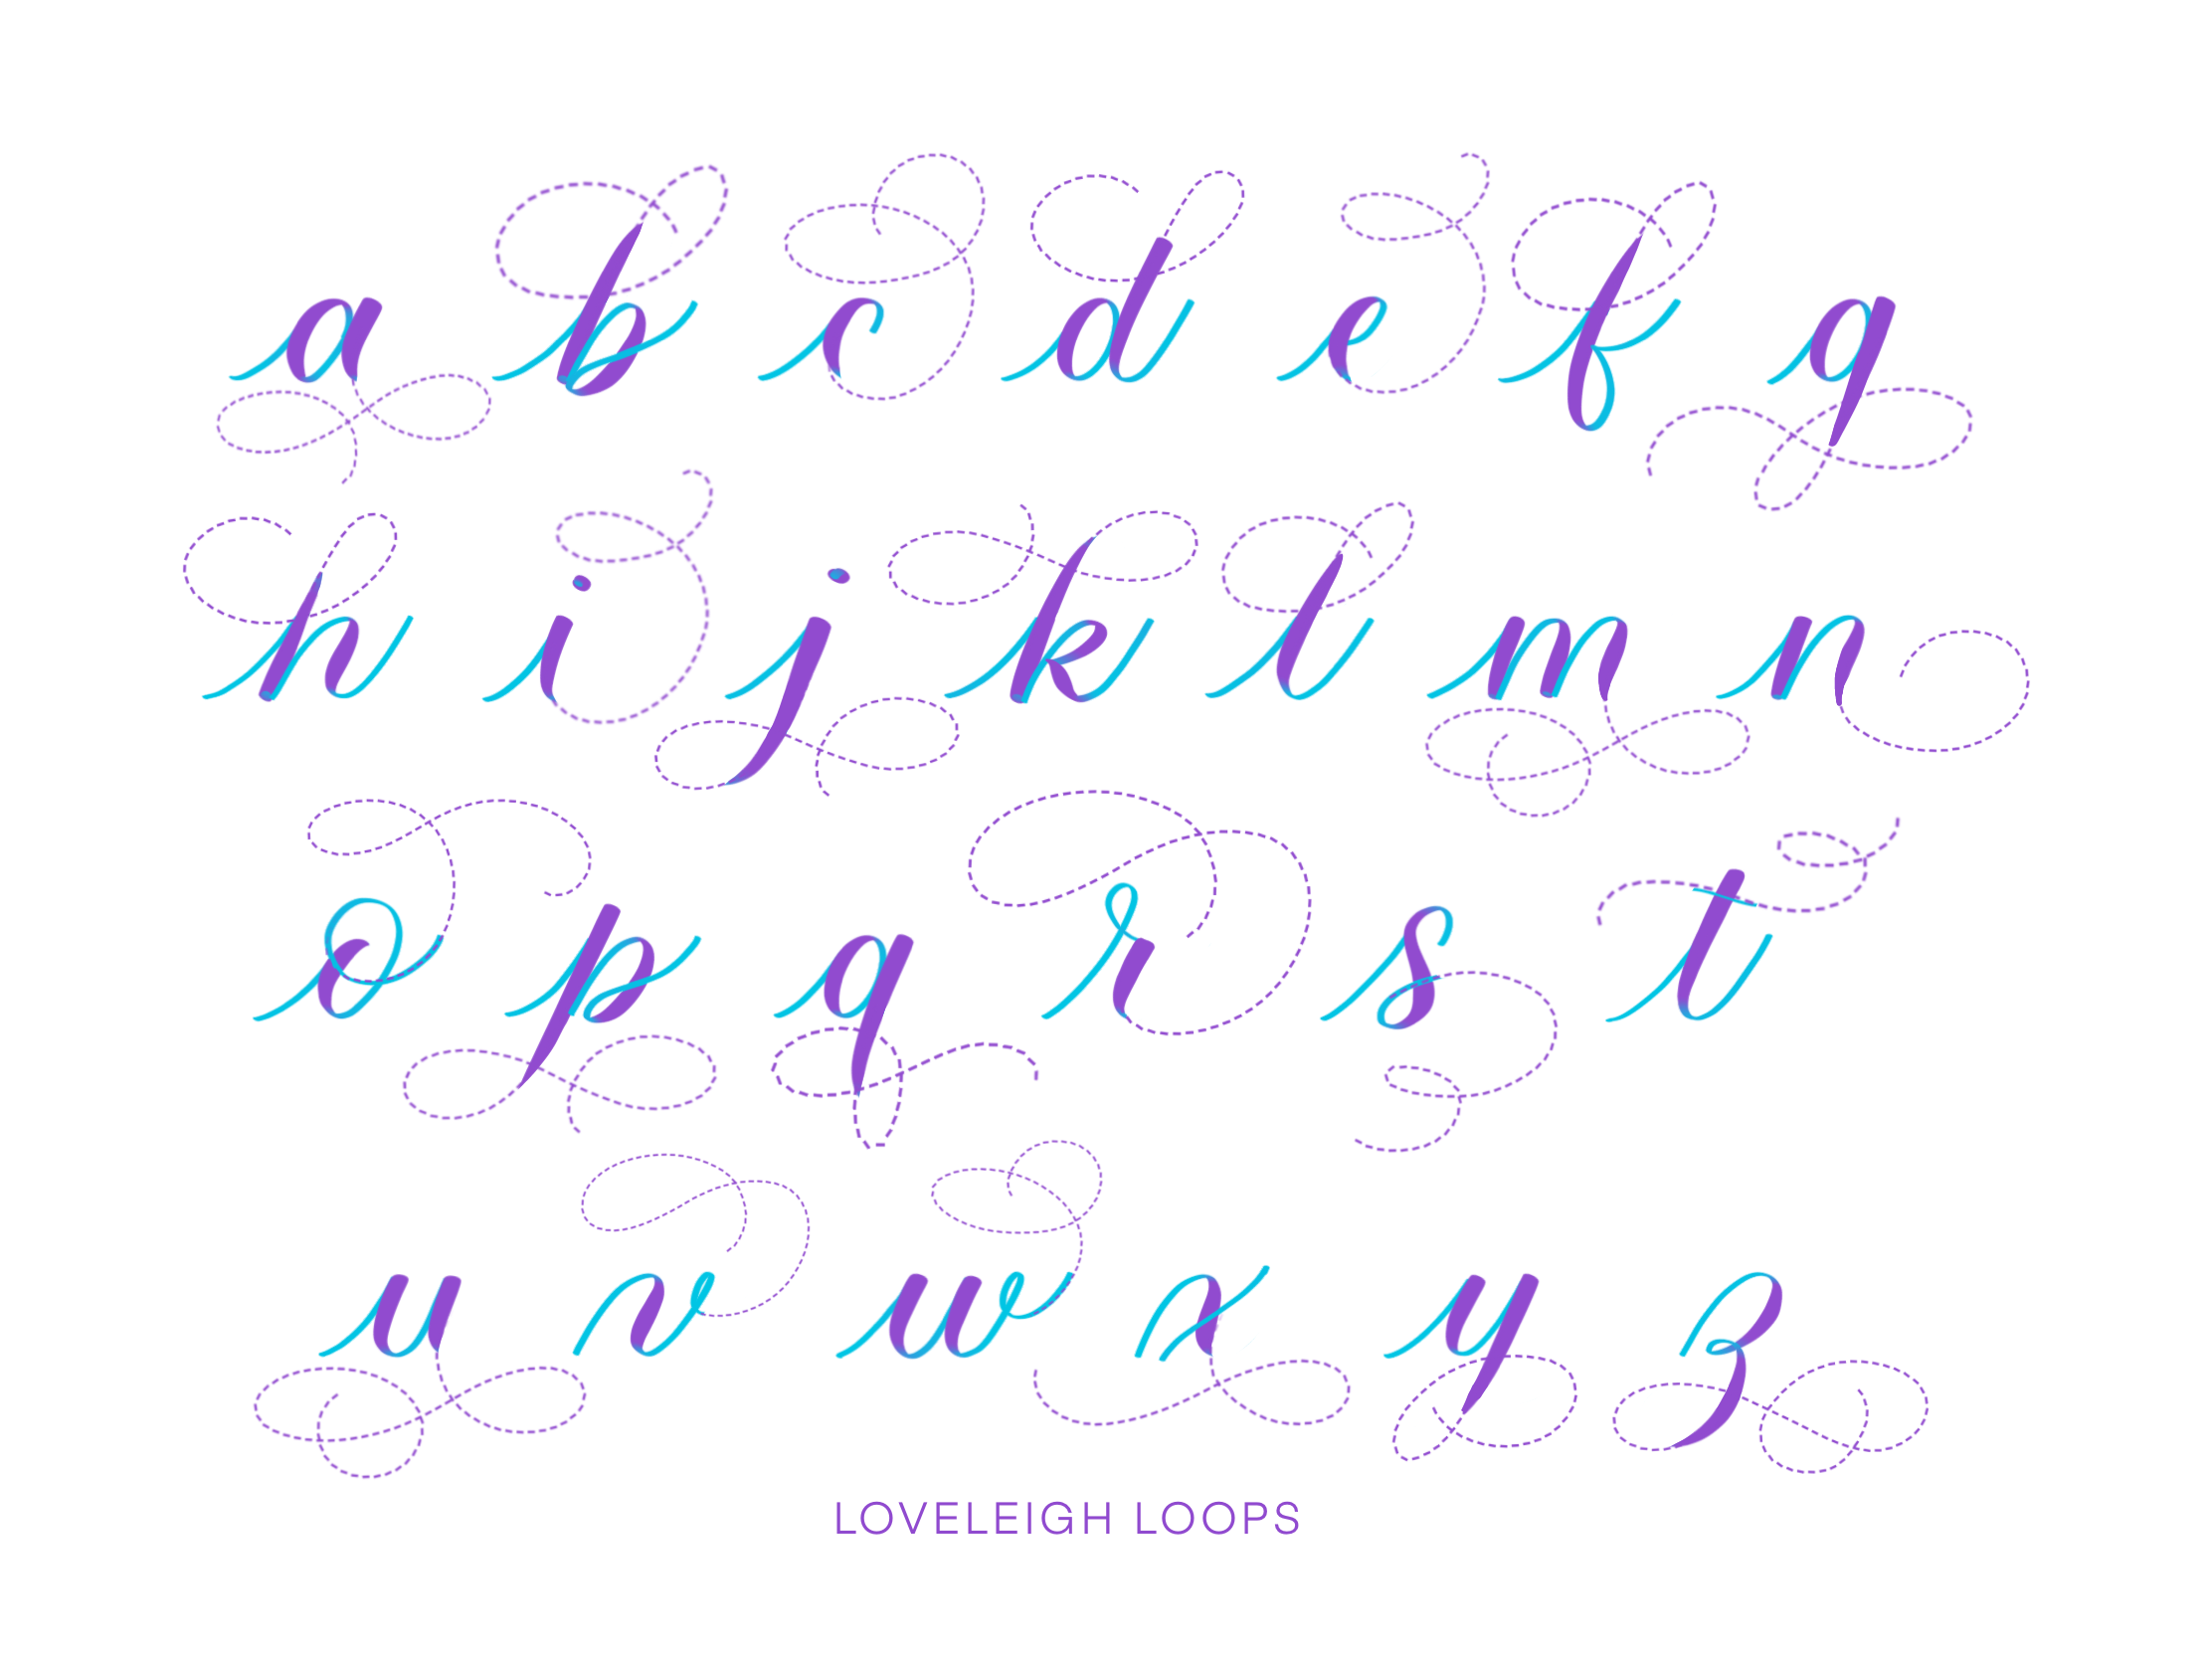
See a version of the flourished Copperplate alphabet from our alphabet guide:

A lightly flourished Copperplate Calligraphy alphabet exemplar
Some Copperplate flourishes don’t actually extend from letters themselves but simply fill white space left on the page, like this example:

Source: Wikimedia Commons.
What Supplies Do I Need For Flourishing Copperplate?
Just like in the old days, Copperplate calligraphy is done using traditional writing tools. Instead of a brush pen or pencil, we use a pointed pen and ink.
While you can technically do traditional calligraphy on the iPad, most calligraphers prefer to do Copperplate with good old (pointed) pen and paper.
With an old-fashioned nib that's pressure-sensitive, can you make thick and thin lines. As you apply more pressure, more ink comes out which results in a thicker line.
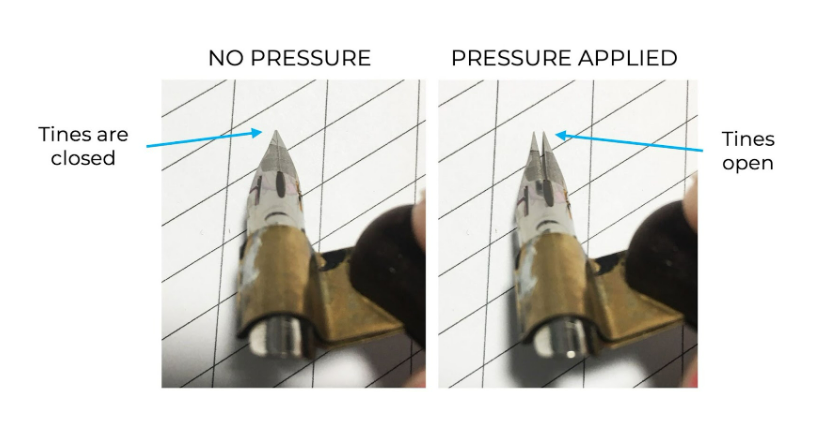
Close up view of a pointed pen nib
If you're thinking about learning Copperplate, then you need the following supplies:
Pointed pen: Choose a beginner-friendly nib and save yourself a lot of frustration. We recommend the Nikko G Nib
Pointed pen holder: This is the pen body that your nib slides into. We recommend the Moblique Pen Holder
Calligraphy paper: Choosing the right paper is important since poor-quality paper can destroy your nib! We recommend HP Premium 32lb Paper
Ink: Although there are plenty of options out there, any beginner's ink will do. We recommend Sumi Ink
Pro tip: If you don't have anything purchased yet, you can get paper, ink, nibs, a pen holder and more with our pre-made calligraphy kit (it's convenient and saves money)

In the beginning, there's a bit of a learning curve when it comes to using a nib, but we've got you covered!
At Loveleigh Loops you'll find plenty of online resources that will make it fun and easy to learn Copperplate. Check out our complete practicing guide jam-packed with Copperplate practice tips here.

An ‘s’ written in Copperplate style with intricate flourishes
Quick tip: If you're not familiar with the Copperplate fundamentals like stem loops and cross bars, then our tips here might be over your head. Start with our videos on Copperplate for beginners first.
You may also like: Traditional Calligraphy Supplies
Learning Copperplate Calligraphy Flourishing
Calligraphy flourishing looks simple but learning the art of flourishing your own calligraphy is often surprisingly difficult. After you've learned all the lowercase letters and capitals, drawing decorative lines that 'feel right' is a lot harder than it sounds.
Not flourished versus flourished
Practicing your flourishing can feel like picking up a violin for the first time. The sound isn't just wrong, it's also a lot louder than you're comfortable with and takes a lot of time to get used to. Believe us when we say that nearly everyone feels like this. We certainly did ourselves!
But it doesn't have to stop there. Over the years, we've taught tens of thousands of lettering students and know that this skill can be understood with the right instruction. And it all starts with understanding one fundamental thing…
The Big Secret To Calligraphy Flourishing
One of the biggest misconceptions about flourishing is that it is spontaneous. When you see calligraphers on Instagram or TikTok finish their work with a whirl of dramatic lines, it looks like they flourish letters based on inspiration in the moment.
The biggest secret to flourishing is that every flourish is the result of careful planning.
In this example, you can see that Jordan is writing the word Hello. She leaves the first letter l unfinished because she's planned a flourish there.
Believe us when we say that most experienced calligraphers, even the ones you might look to for inspiration, plan out their flourishes ahead of time and so should you. We share our planning process in-depth in our iPad flourishing tutorial.
The Basics Of Flourishing
Flourishing is all about finding your own unique angle and style. However, there are a few basic principles that you can't ignore. While learning how to flourish your lettering and create your own flourished designs is hard, this introduction to Copperplate flourishes will help you avoid the common beginner mistakes.
In this tutorial, we'll go over some of the basics but if you're looking for a deep dive then check out our flourishing practice guide. Here you'll find more information and practice tips to help you get started. Let's look at some of the basic principles of flourishing for the Copperplate style of calligraphy.
Check out our video tutorial if you prefer to watch:
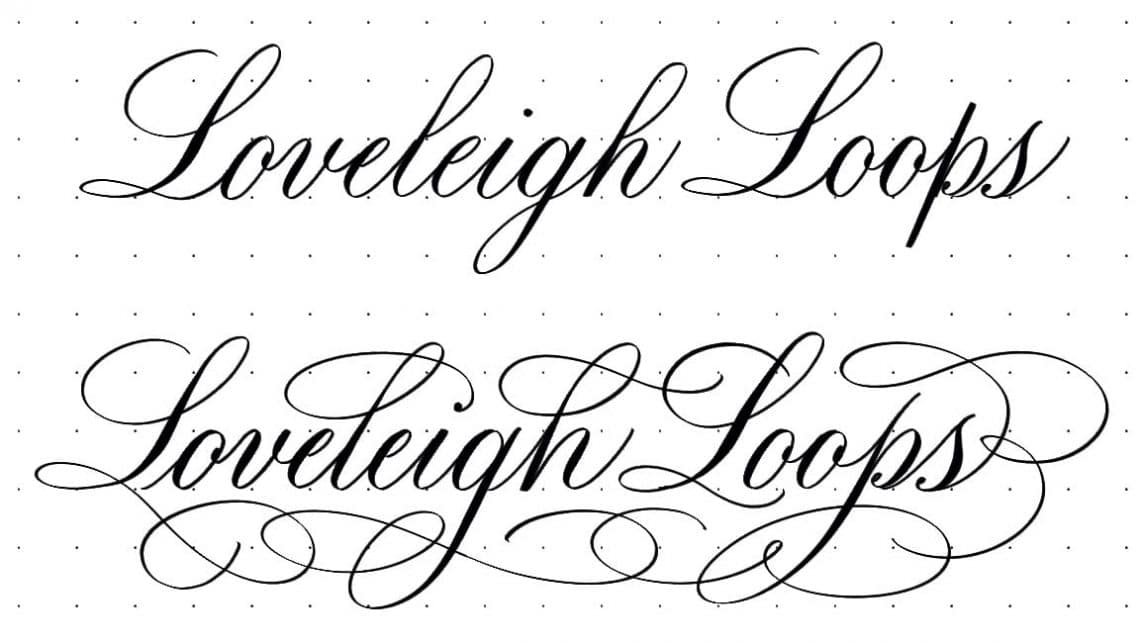
1. Size Matters
One of the most important things to remember for beginners is that flourishes should never interfere with legibility. As a general rule, bigger flourishes are more pleasing to the eye than smaller ones.
Let's look at what this looks like in practice.
In the example below, the second version is easier to read than the top one thanks to its size. By making your flourishes bigger, you avoid any confusion while making sure the words themselves can still clearly be read.
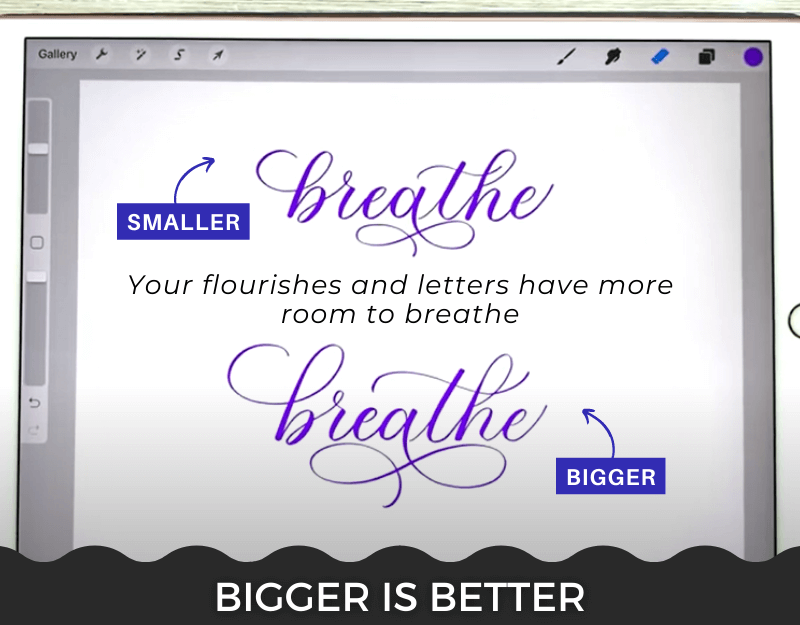
Flourish size breakdown
2. Avoid Crossing Thick Lines
Remember how Copperplate has a clear contrast between thick and thin lines?
The same contrast needs to be applied when flourishing your words. When you're flourishing a piece of Copperplate calligraphy, be aware of the thickness in your lines as it has a profound impact on the final result.
As a general rule, avoid crossing two thick lines. It makes your letters look clunky which is the opposite of what you're trying to accomplish.

Easy flourishing tip
3. Always Cross At A 90-Degree Angle
Speaking of crossing lines, over the years we have learned that the angle at which lines cross matters a lot. Our rule: every time you cross a line, try crossing at a 90-degree angle.
With this trick, you ensure that your flourishes don't look flat and that the end result is more pleasing to the eye.

Beginner flourishing mistake
Placing Flourishes
For beginners, flourishing often seems random. Thankfully you now know that the #1 secret to flourishing your Copperplate is to plan things out in advance.
Now that we've looked at some of the basics and principles of flourishing in Copperplate calligraphy, let's look at the best places to add flourishing in your lettering.
Best Places To Flourish
In the hands of a skillful artist, flourishes can be placed anywhere in a word or quote. A skilled calligrapher is able to find the best opportunities for embellishing their calligraphy.

The 5 key spots to add calligraphy flourishes
However, for beginners, we recommend adding them in the following places:
Ascending stem loops
Descending stem loops
Dnding
Crossbar of the t
End of word
These are definitely not the only options for adding flourishes but they give you a good starting point.
We have an entire video tutorial on flourish placement:
Understanding where to flourish is all about understanding your layout and composition. Each letter in a word or even each word within a quote has white space. Successful flourishes succeed at filling this space in an elegant manner.
You may also like: “Happy Birthday” Calligraphy Tutorial
Offhand Flourishing
In some historic examples of pointed pen calligraphy, you can see decorative elements that are not part of the text. This style of embellishing is called offhand flourishing and it's a special kind of flourishing that is often found in Copperplate as well as other traditional styles of calligraphy.
Here’s an example of Jordan making a bird flourish using this technique:
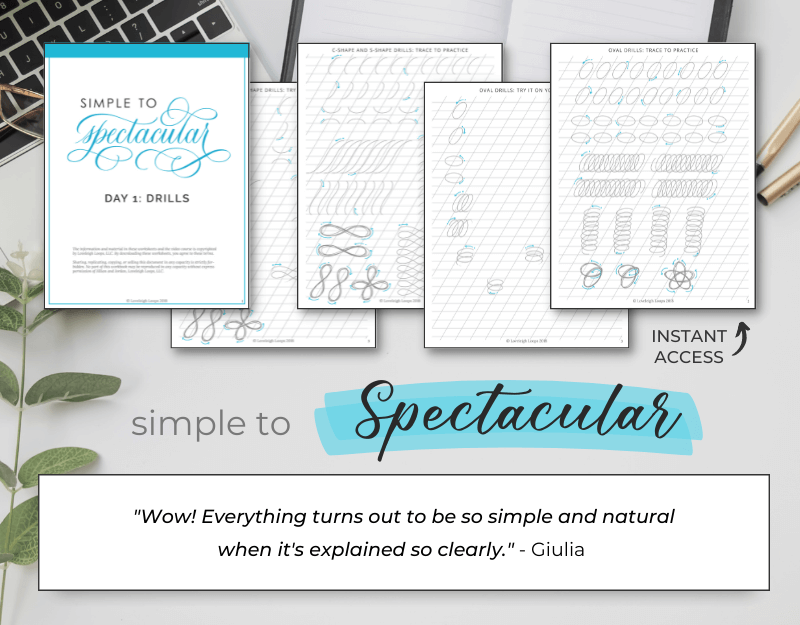
Free Flourishing Course (+ Worksheets)
We believe that learning Copperplate flourishes is something that should be accessible to everyone, which is why we've created an entire free flourishing course: Simple to Spectacular.
Enroll now for instant access to printable worksheets, step-by-step videos and more:
Just remember to print your practice sheets on the right paper!
We have an entire paid flourishing course that you can actually get for just $7 (usually $200) a month in our membership.
Flourishing Membership: The Flourish Space
Flourishing is a technique that no one's ever done perfecting. You can always try new tools and experiment with different flourish compositions or styles. That's exactly why we created our membership The Flourish Space.
Our best-selling flourishing course
A private community of students
Live video training 2x a month
Analysis of your work
And more!

Explore here to see if The Flourish Space could be your perfect solution:
Next Steps
Recap! Follow these steps to further your Copperplate flourishing journey:
Take our free course
Join our Facebook group to meet your new lettering friends
Follow on Instagram for calligraphy tips 3x a week
Considering joining The Flourish Space for $7 a month
This is just the beginning of our support! Join our online community to share similar ideas, popular flourishes, and your progress with fellow students and calligraphers.
You're going to AMAZE yourself with what you're able to create!
We're rooting for you and hope that you'll make yourself at home here at Loveleigh Loops.
