
Basic Calligraphy For Beginners [GUIDE + FREEBIES]
Is there such a thing as basic calligraphy? At Loveleigh Loops, we answer that question with a resounding yes!
Calligraphy is more than just nice handwriting; it's an art form, but getting started is actually not as hard as it seems. You don't need to enroll in an in-person workshop or spend a lot of money on lettering tools.
It's just a matter of getting a few basic supplies (we're talking about Dollar Tree-level spending), and most importantly, someone pointing you in the right direction! (cue us waving enthusiastically).
Pause now and pin it for later! ↓
We're Jillian and Jordan, the founders of Loveleigh Loops. We've taught tens of thousands of calligraphy students and we're ecstatic to help you learn today.
Today, let's break down the subtle art of calligraphy into manageable chunks and prove to you how simple calligraphy for beginners can really be. Let us be your guide and show you where to put your feet as you take steps deeper into the exciting world of calligraphy.
Table of Contents
What Is Calligraphy?
When we discuss calligraphy, what we're really talking about is the art of writing beautifully.
With the use of simple calligraphy pens and good technique, a calligrapher is able to produce elegant and beautiful writing. It's an art form that's been practiced all over the world and traces back to the beginning of the written language.

Calligraphy is the art of beautiful writing
The exact type of work generally falls into one of two main varieties of calligraphy: traditional or modern calligraphy.
Traditional Calligraphy
The last time you saw a wedding invitation or a degree certificate in your doctor's office, you probably saw an example of traditional calligraphy. Traditional calligraphy styles such as Copperplate, Spencerian or Blackletter calligraphy are based on those found in historical works.
Traditional calligraphy has many distinct rules and characteristics. Learning calligraphy is all about following in the footsteps of historical calligraphers as you learn and perfect the same traditional scripts.
You may also like: How Calligraphy has Changed Over the Years
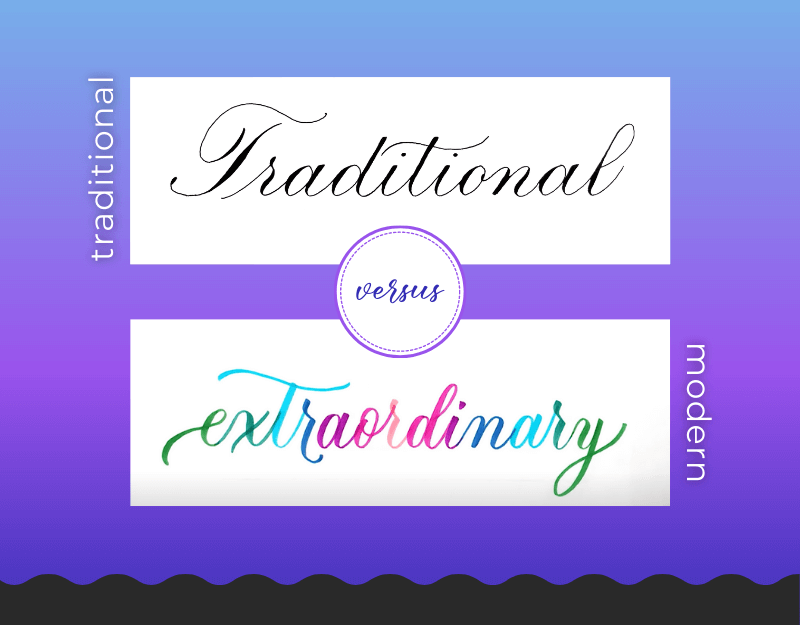
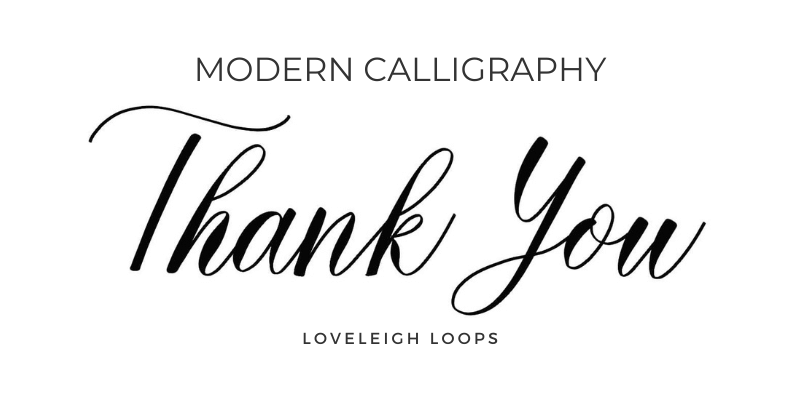
Modern Calligraphy
Although modern calligraphy is based on traditional principles, there's freedom to break free of them and develop your own unique style of writing.
Modern calligraphy is often used for greeting cards or quotes and tends to be more playful and quirky looking than traditional calligraphy.
Both styles of calligraphy have their uses, and a quick look at the home decor aisle at Target shows that calligraphy is very much alive!
You may also like: Traditional vs. Modern Calligraphy: What's the Difference?
Take a look around your space right now - do you notice any calligraphy? Keep your eye open for it next time you’re on Instagram or Pinterest! Speaking of which, we’d love to connect with you there 🙂
After you connect with us on your platform of choice, keep scrolling to keep learning.
Psst… Prefer to watch?! We also have a video explaining basic calligraphy! ↓
How Is Calligraphy Different From Cursive Writing?
Although calligraphy is a form of handwriting, that doesn't mean that all script-y handwriting is calligraphy. When we were practicing our cursive in elementary school, we were practicing just that… cursive handwriting.
I mean, calligraphy is the art of beautiful writing. That alone is enough to disqualify our earliest cursive writing attempts! 😂
As kids, we were taught to write quickly by using letters that are joined together and without lifting the pen off the page. Good handwriting is used for writing quickly rather than beautifully. While cursive writing CAN be beautiful and even elegant, it shouldn't be mistaken for calligraphy.
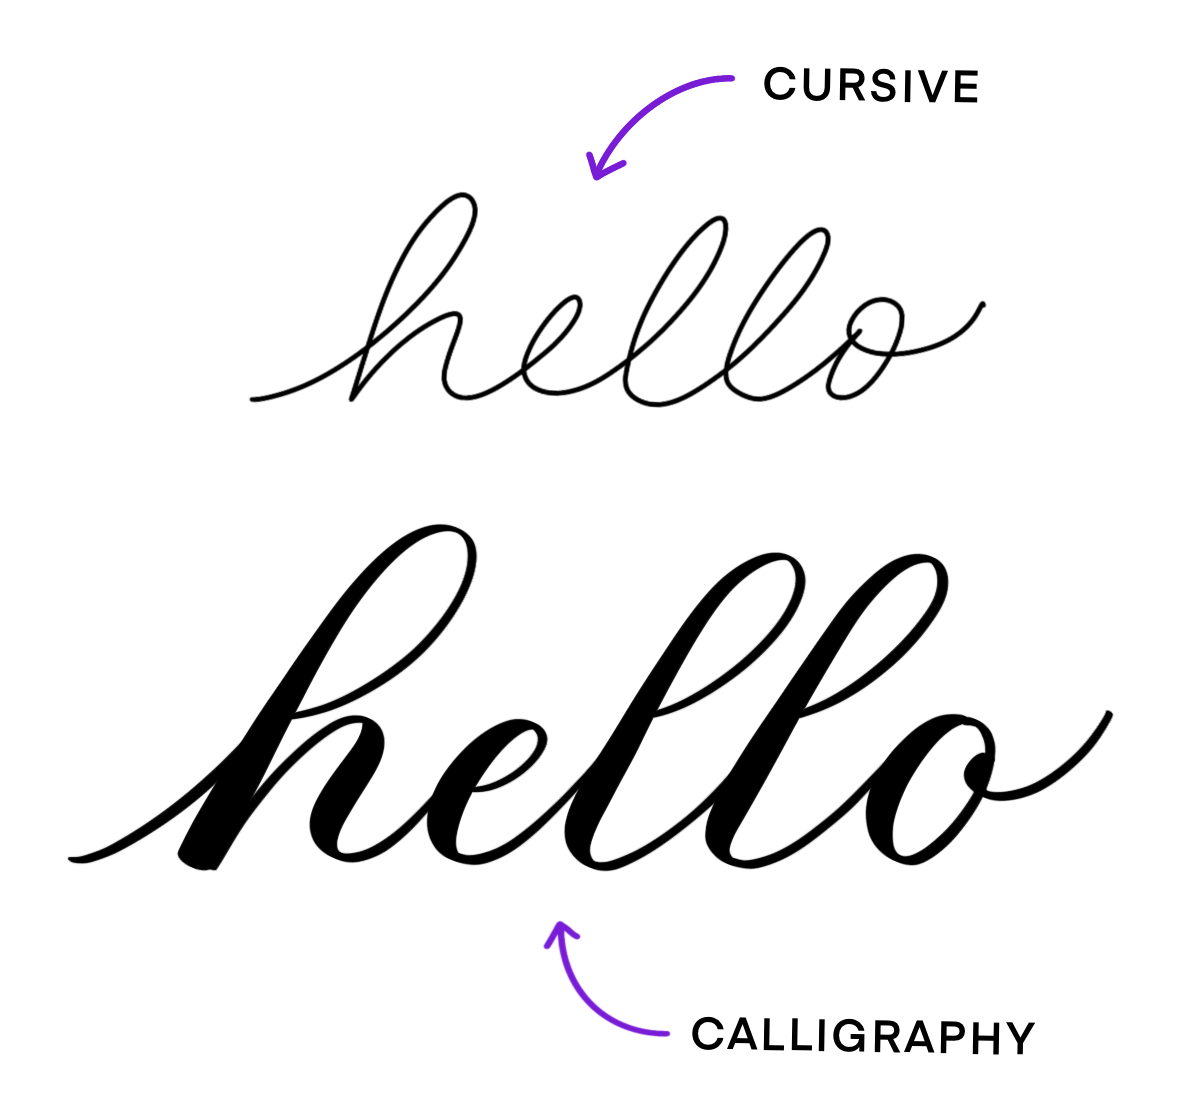
Side-by-side comparasion of cursive versus hand lettering versus calligraphy
In calligraphy, writing involves lifting the pen off the page, not just between letters—but also within letters. Unlike the continuous movement that you see in cursive handwriting, each letter is made from a combination of individual, well-rehearsed strokes.
Learn more about the differences between cursive and calligraphy here.
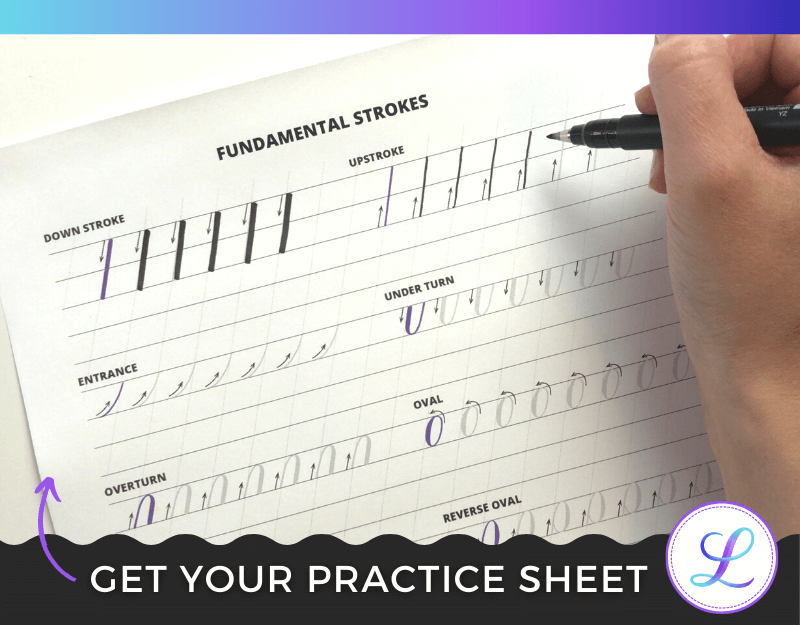
The Basic Strokes Of Calligraphy
These individual strokes are called the basic calligraphy strokes and they are the building blocks of any calligraphy style. A student of calligraphy tries to master each stroke by practicing them to perfection.
If you've heard terms like descending loop, ascending loop, and compound curve thrown around, you've actually already come into contact with the basic calligraphy strokes (you're already more advanced than you thought!).
There are seven that make up the basic lowercase alphabet:

You can follow along with our basic calligraphy strokes for beginners video tutorial if you’re ready to try your hand!
We also have a basic calligraphy strokes pdf to help you practice.
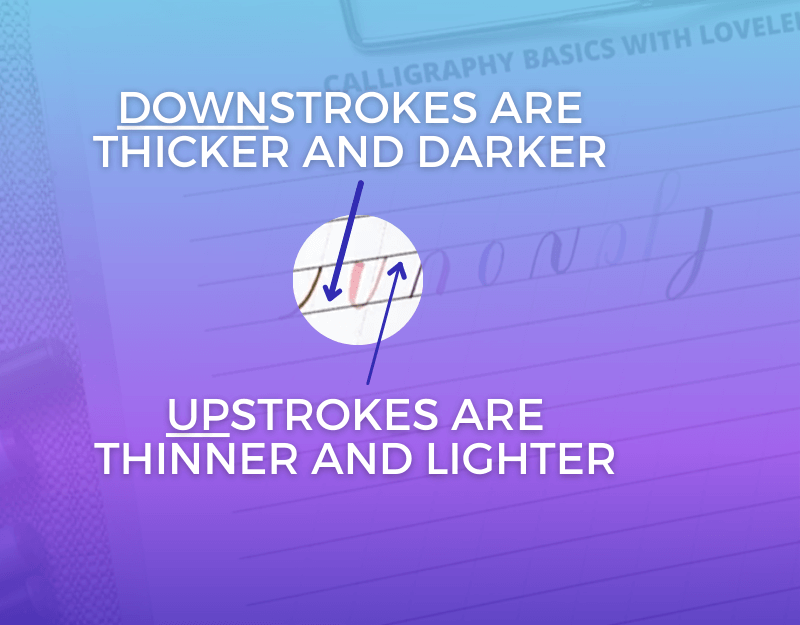
As you look more closely at calligraphy, you'll notice that there seems to be a very natural distinction between thick and thin lines within each letter.
When you're writing and your utensil moves down the page towards you, that's called a downstroke. Downstrokes are always thick, and you get thick downstrokes by applying more pressure to your writing utensil.
When your utensil moves up the page away from you, that's called an upstroke. It's always thin, and you create thin upstrokes by applying less pressure to your writing utensil.
You may also like: Our Favorite Lettering Supplies
Commit that rule of thumb to memory and you already understand so much about basic calligraphy that escapes that average viewer’s eye: upstrokes are thin and downstrokes are thick.
While mastering the basic calligraphy strokes takes some time, seeing improvement does not take much time at all. You should be able to see some improvement with as little as 15 minutes of practice!
Let’s grab some supplies so you can hit the page!
You may also like: World Calligraphy Day Guide
How To Learn Calligraphy For Beginners
If you want to learn calligraphy, learning the basic strokes is an essential step. But it's only the first step of learning calligraphy.
Besides writing beautiful letters, calligraphy involves:
Mastering your writing tools
Understanding the design principles behind a beautiful calligraphy piece
Exploring different calligraphy styles and scripts
The world of calligraphy is incredibly colorful, rich and creative and deserves to be explored. We highly recommend joining one of the many online calligraphy communities on Facebook (like our group!) and following calligraphers on Instagram for examples by other students.
Modern calligraphy example
How To Practice Calligraphy
Building your calligraphy skills is all about building muscle memory. Through a series of exercises and drills, you'll become familiar with the basic letter forms as well as the writing utensil you're using.
In order to get the most out of your practice routine, consider the following best practices:
Practice regularly: 10 minutes a day is better than two hours once a week
Make it easy: Keep your calligraphy supplies at hand to make it easy to practice
Use practice sheets: From traditional pointed pen calligraphy to modern brush pen calligraphy, we have free worksheets for you in our worksheet library
Date your work: Write today’s date at the top of your practice pages. Nothing is more motivating than seeing how far you've come!
As beginners, you'll find that practicing calligraphy is very satisfying and it won't take long until you'll see huge improvement. When you practice, always focus on consistency more than anything. Are your downstrokes equally thick? Your loops of similar length?

We still practice regulalry, even after 15+ years!
What To Practice
So you've found some time in your day to work on your calligraphy skills, but then what do you do? Make sure you cover all the most important areas:
Basic strokes: These simple strokes a fundamental part of lettering for both uppercase and lowercase letters
Daily prompts: Join one of our monthly challenges where you’re given daily practice prompts
Alphabets: Learning different scripts begins with learning different letters
Writing Tools: Special tools like nibs and brush pens come with a bit of a learning curve and learning when to apply pressure in your thick downstrokes is tricky for beginners
Drills and exercises: Even the pros still work on them!
Composition: Don't postpone making final pieces until you're "ready" — your composition skills will develop
Check out the free resources on our website where you can find free worksheets and everything you need to practice this beautiful art form. Let's grab some supplies so you can hit the page!
Choosing Basic Calligraphy Supplies
Things like different pens and accompanying inks, different kinds of paper, or even digital tools like an iPad are commonly used in calligraphy. Obviously, an iPad is quite the investment but thankfully most calligraphy tools are very affordable.
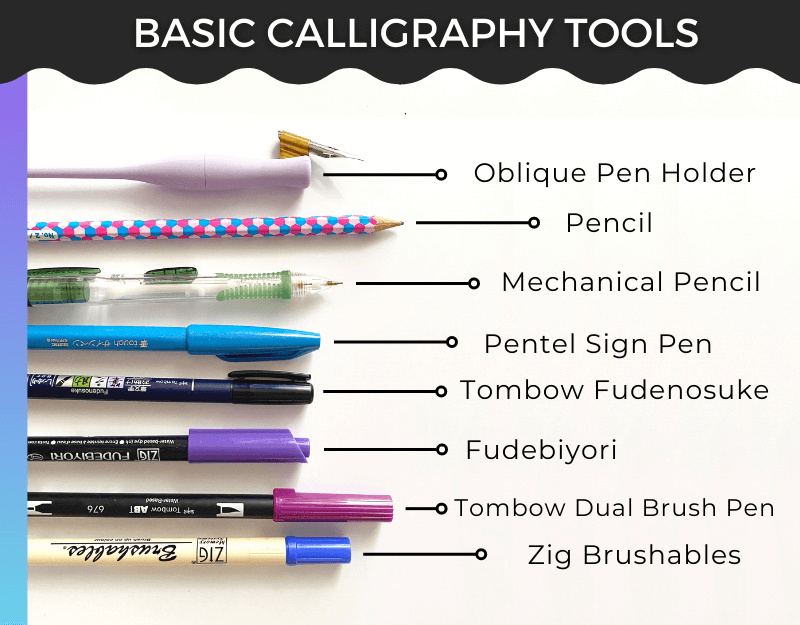
Calligraphy Pens For Different Styles
Whether you need a dip pen, brush pen or even an Apple Pencil largely depends on what calligraphy style you want to learn.
While true calligraphy requires certain specialized tools, you don't have to postpone embarking on your calligraphy journey until you get them. In fact, you can get started today and all you need is a pencil and a piece of paper.
You may also like: How to do Calligraphy with a Normal Pen
Prefer to let us pick out calligraphy supplies for you? We made our own Loveleigh Loops supply kit for you with basic calligraphy tools perfect for beginners that you can order today.
But you don’t need to wait for your kit to arrive in the mail to start making progress.
Pencil Calligraphy
Using a pencil is the most low-tech and accessible way to start learning calligraphy. After all, who doesn’t have a pencil lying around?! The eraser on the back of a pencil makes this a very forgiving tool that’s perfect for beginners or even kids.
With a pencil, you can practice different techniques without worrying about making mistakes. Besides the option of just erasing any mistakes, you also don’t have to worry about wasting specialized ink or paper.
In fact, a simple pencil and a piece of paper are all you need to get started with faux calligraphy. If you need a good place to start practicing, try the basic calligraphy alphabet or your favorite quote.
You may also like: Calligraphy Alphabet: 60 Styles
Choosing The Right Pencil
Although you don't need to get a special pencil to start practicing, some pencils are better suited for calligraphy than others. Pencils are not all the same when it comes to hardness. Some pencils are extremely hard whereas some are comparatively nice and soft.
The hardness of a pencil can be seen on the pencil itself. Just below where the eraser is on the tip of the pencil, look for either the letter H (stands for hard) or the letter B (stands for black). This letter indicates the hardness of the graphite inside the pencil. H is harder than black so a 2H pencil is harder than a 2B pencil.
Calligraphy requires differences in pressure to get thicker or thinner lines. As a result, when you pick a pencil for calligraphy, it's best to pick a one that's on the softer side. Generally, as long as you see the letter B, whether it's 2B or HB, you're good to go!

See our more in-depth guide on how to get started with pencil calligraphy.
The humble pencil is great for your first steps and for designs that may need multiple revisions. However, after a while, you may be interested in moving on to a writing tool that is less faint and more permanent.
This leads us right into the next calligraphy tool: the brush pen.
Brush Pen Calligraphy
A brush pen is a popular type of basic calligraphy pen, and it's exactly what it sounds like: a normal marker but with a flexible brush-like tip which makes it perfect for calligraphy. Brush pens come in various sizes and getting one won't break the bank.
One of the biggest perks of using a brush pen is that it's so easy to get out. You don't need to prepare anything before you can start and, even better, there's hardly any cleaning up after you're done!
The flexible tip on a brush pen enables you to practice pressure control, which is one of the fundamental skills of calligraphy. This also means that they come with a bit of a learning curve.
Although a brush pen can be used to create both thick and thin lines, you’ll find that they’re not equally easy to produce.
The thin upstrokes in particular require a light hand and this is something that may take some time (and practice, practice, practice) to fully master.

Brush pen calligraphy quote
Once you get the hang of it, you’ll see that the results are more than worth it. With this tool, you can create calligraphy that looks fun, colorful, and professional.
Let’s run through the pros and cons of the most popular types of brush pens so that you can decide which one to try first.
You may also like: How To Use Brush Pens
Tombow Dual Brush Pen
Here’s an example of how the popular Tombow Dual Brush Pens looks in action:

Tombow dual brush pen demonstration
You may also like: Brush Pen Comparison Guide
The Tombow ink is water-based and gives you so much creative potential for techniques like blending.
Despite its popularity, this pen might not be the best choice for absolute beginners as the flexible tip can be tricky to work with at first. This is why a pen with a slightly firmer tip can be a better choice.
Buy a Tombow Dual Brush Pen here
Zig Brushables
The Zig Brushables are a little more expensive than the Tombow, but could be perfect for you. This brush pen has a tip that's a little firmer than the Tombow Dual Brush Pen which makes it very beginner-friendly.
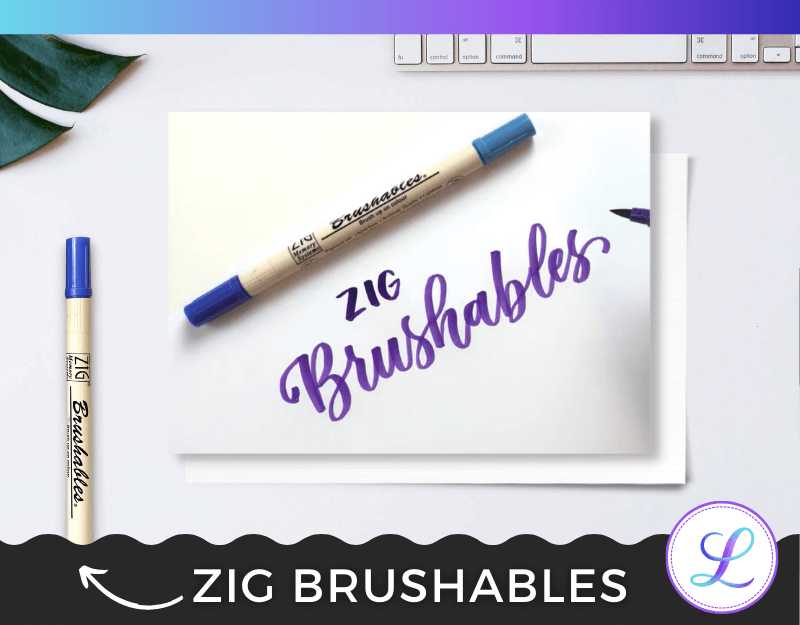
To see a demonstration of how each of these pens writes, watch our basic calligraphy video on YouTube.
Although you may have to go to a specialized art store in order to pick up one of these, it could very well be worth it as you will find these pens easier to work with while you’re learning the basics.
Tombow Fudenosuke
The Tombow Fudenosuke is one of the most popular smaller-sized brush pens. It has the benefit of being roughly the same size as a normal pen and the firm tip makes it very beginner-friendly.
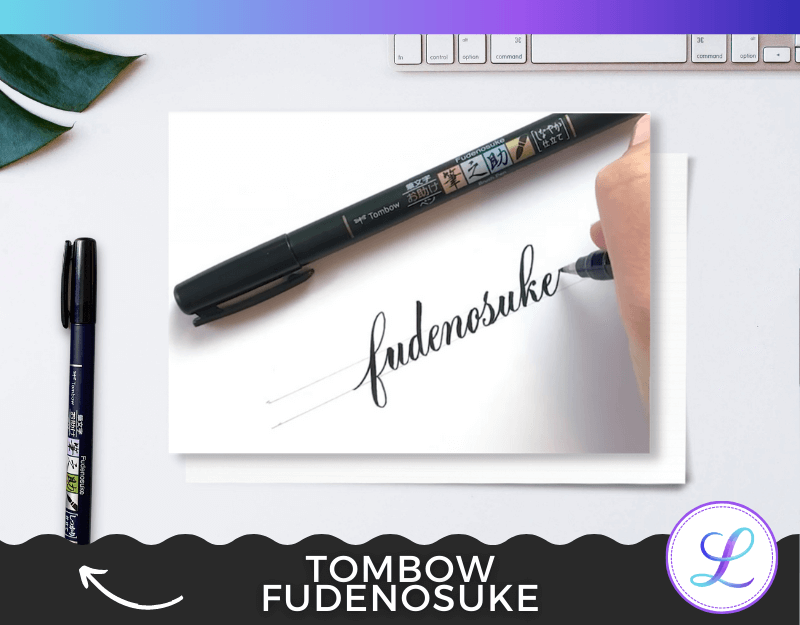
Tombow Fudenosuke demonstration
Pentel Sign Pen (With Brush Tip)
If you can hear the smaller brush pens calling your name then you’ll also want to consider the Pentel Sign Pen. The look and feel of this brush pen is very much like the Fudenosuke, but the Pentel comes in a wider range of colors.

Pentel Sign Pen demonstration
Our favorite thing about this brush pen is the ink. It’s juicier and the colors are generally more vibrant than some of the other smaller pens.
Buy a Pentel Sign Pen (with brush tip) here
Zig Fudebiyori
If you’re having a hard time deciding between a bigger or smaller brush pen, why not choose something that’s smack dab in the middle!

Fudebiyori demonstration
This is where you can find the Zig Fudebiyori, a medium-sized brush pen with a firm yet flexible tip. Could this one have your name on it??
If you’re like us and think ALL of these calligraphy utensils sound amazing, consider one of our calligraphy pen kits so that you can try them all:

Pointed Pen Calligraphy
If you want to learn to write calligraphy in traditional styles then you can't really avoid learning how to use a pointed pen.
With a nib, flange and pen holder, a dip pen looks like something from a distant past. Add an oblique holder to the mix and you've got something truly intimidating.
Back in the day when we first started learning calligraphy, learning how to apply pressure without ink going everywhere was a tough lesson to learn!

A pointed pen writing traditional calligraphy
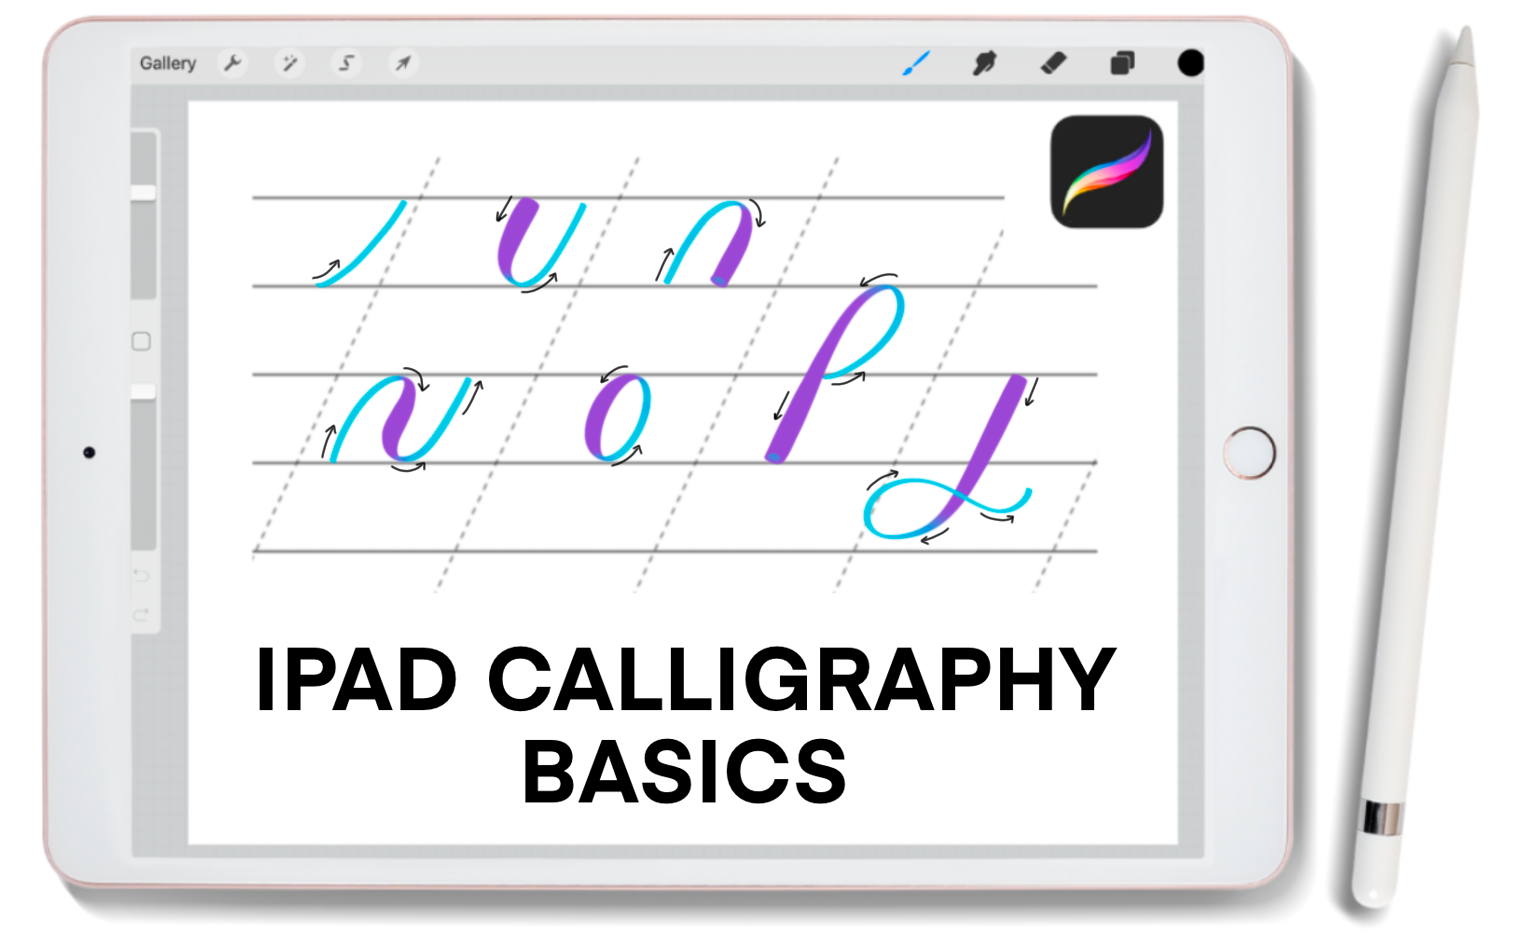
iPad Calligraphy
Thanks to the Procreate app and the Apple Pencil, digital calligraphy has gained a LOT of traction in recent years. It’s a fun tool, but just because it’s popular doesn’t necessarily mean it’s worth the investment for your calligraphy hobby. Let’s look at the pros and cons.

You may also like: Which iPad should I get for Procreate?
The portability and brush lettering style options of the iPad can’t be beat. There are essentially endless tools at your fingertips at all times, and it’s great if you want to create digital artwork and minimize the tools you buy.
However, for anyone who wants to specialize or focus on traditional or modern calligraphy, the iPad alone is not enough. Traditional calligraphy requires paper and ink.

Plus, it can be difficult to transition from writing on a glass surface to writing on paper. You double your learning curve by switching between two different mediums, not to mention having to navigate the interface.
The price can also be prohibitive, but we still love and recommend iPad calligraphy (and even have suggestions for different budget tiers to help you minimize the investment).
Already have an iPad? Get practicing right now with our free iPad calligraphy practice worksheets:
Choosing The Right iPad And Tools
This part is important for anyone buying a secondhand iPad: make sure that the version of your iPad is compatible with the Apple Pencil and is pressure-sensitive. Here are our recommendations.
For buying an iPad on a budget, we recommend these tools:
You may also like: Top iPad Accessories for Procreate
If you have a wider spending range, we recommend these tools:
iPad Pro - 11-inch iPad Pro or 12.9-inch iPad Pro
Apple Pencil grip - here is Jordan’s pick and Jillian’s pick
You may also like: Paper vs. iPad (and How to Make the Switch)
Speaking of making the switch better paper and glass, we need to talk about what paper you’ll be switching to!
Choosing The Right Paper
While you can use any type of paper (even post-its!) for some types of calligraphy, such as marker or pencil calligraphy, it’s a best practice to choose your paper type intentionally.
We recommend using the HP Premium 32lb Paper. This is a high-quality paper that’s very smooth to write on and nice and thick.
You can use a bare sheet (right out of the pack) to write on, or print guidelines to practice on, or even use this paper to create final pieces. HP Premium 32 is also an economical option because it comes in reams of 500 pages.
Another paper type that we recommend is the Canson Marker Paper. This marker paper is great for tracing. It’s thin enough to see through but doesn’t tear, so you can use it over guide sheets without printing new lines each time. It’s super smooth and perfect for practicing drills and planning layouts.
The marker paper comes in our calligraphy supply kit that we mentioned earlier.
Did someone say practice?! (We’re always saying practice, but why not when practice is this fun!)
Calligraphy Practice Tips
Before you start experimenting with different styles, we recommend working on the fundamentals of calligraphy.
A great starting point is faux calligraphy, and we have a completely free, in-depth course that you can get instant access to right now. Join here!

If you’ve always wanted to try simple hand lettering, this is your sign (cue the harp music)
Learning how to use your preferred writing tool to apply different levels of pressure is what’s at the heart of calligraphy. This is why we recommend that all beginners download one of our free practice sheets and work on mastering the basic strokes of calligraphy:
When practicing calligraphy, consistency is very important. In fact, you’ll get better results if you practice a few minutes daily than you would if you practiced two hours once a week. As little as 15 minutes a day is enough to see tangible improvements! It’s pure fun (at least it is to us).
Online Calligraphy Courses
Everyone needs someone pointing them in the right direction to really learn calligraphy and have this hobby blossom.
There are countless books out there with examples and tips to get you started (many of which are fantastic!). But learning a practical skill like calligraphy from a book is kind of like learning how to swim by looking at pictures. It’s better to actually see someone do what you’re trying to do and be coached (instead of confused).
If you’ve been wondering how to learn calligraphy step by step, one of our courses is your answer.
More calligraphy tutorials:
How to write mom, dad, grandpa and grandma in calligraphy: Learn Here

We love being your calligraphy teachers!
What would you like to learn first?
Next Steps
Does calligraphy feel more approachable now that you understand the basics? We hope so! And we hope you’ll stick around and keep practicing with us here at Loveleigh Loops.
Calligraphy is a wonderful hobby that can bring so much fun and creativity into your life. Make yourself comfortable and dive into our video tutorials, blog posts, or free courses right now.